

Join Hack Club Flavortown! Ship your projects and earn free prizes →
Hello friends! We need a community member to update this workshop to work without Cloud9. Interested? Message an admin in slack! Until then, this will live in the Retired section.
Ajar.io
Agar.io is a popular game built for the web with HTML, CSS, and JavaScript. The goal of this workshop is to teach you to make your own simplistic version of agar.io which we'll call ajar.io.
The workshop will be divided into several parts (check indicates workshop has been written):
- [x] Part 1 - Display the user's cell on screen.
- [x] Part 2 - Convert the code from part 1 to use functions.
- [x] Part 3 - Make the user's cell follow the mouse cursor.
- [x] Part 4 - Add velocity to the cell's movements.
- [x] Part 5 - Generate hardcoded food.
- [ ] Part 6 - Randomly generate food.
More coming soon…
Tips And Tricks
- To open a link in another tab, right click on the link and select
Open In New Tab. - When copying code from this workshop to your project try retyping the code yourself instead of using your copy-pasting shortcuts. Forcing yourself to read through the code as you retype it can help increase your understanding.
Part 1
In this part you're going to learn to display the user's cell on-screen using
the HTML <canvas> element.
The HTML
<canvas>element is used to draw graphics, on the fly, via scripting (usually JavaScript).
The
<canvas>element is only a container for graphics. You must use a script to actually draw the graphics.
Canvas has several methods for drawing paths, boxes, circles, text, and adding images.
--- from W3C
By the end of this part you'll have something that looks like this:

Check out the demo here (JS Fiddle).
Creating the files
If you haven't already set up Cloud9, click here to be taken to a guide on setting it up. Once you've done that, continue over here.
In Cloud9, create two files in a folder of your choice:
index.htmlapp.js
Your folder should look like this:

Setting up the HTML
Type the below code as it is written exactly into your index.html file in
Cloud9 (no copy-pasting :p):
<!DOCTYPE html>
<html>
  <head>
    <title>Ajar.io</title>
  </head>
  <body></body>
</html>
Next, add the below <canvas> element inside of the <body> element.
<canvas id="canvas" width="500px" height="500px"></canvas>

Understanding The Code
canvas- The canvas element allows you to draw shapes and other visual elements on screen. Feel free to read more about canvas.
id- To review, this attribute, which can be applied to any HTML element, allows you to use that element in your JavaScript.
width- Specifies the width of the<canvas>, this time in pixels.
height- Specifies the height of the<canvas>, this time in pixels.
Now we have to tell our HTML (index.html) to use our JavaScript (app.js). In
our index.html file we add the following line inside of the the <body>
element (make sure it's at the end):
<script type="text/javascript" src="app.js"></script>

Your HTML is now configured!
Writing the JavaScript
The bulk of this workshop will take place in our the app.js file. If you
completed the previous section successfully, your app.js file should be linked
to your HTML (index.html).
Let's start by writing this line:
var canvas = document.getElementById('canvas')

Understanding The Code
var- Creates a variable namedcanvas. Variables are containers for storing data values. In this casecanvasis used to reference the<canvas>element from your HTML.
document.getElementById("canvas")- This function gets an element from your HTML that has the id you provide inside the quotes, in this case "canvas". Feel free to read more about functions.
The
<canvas>element retrieved bydocument.getElementById("canvas")gets assigned to the variablecanvas.
Next, write this line of code:
var context = canvas.getContext('2d')

Understanding The Code
You create another variable, this time named
context. Don't worry too much about whatcontextis, just know that we will be using it to draw shapes on the canvas.
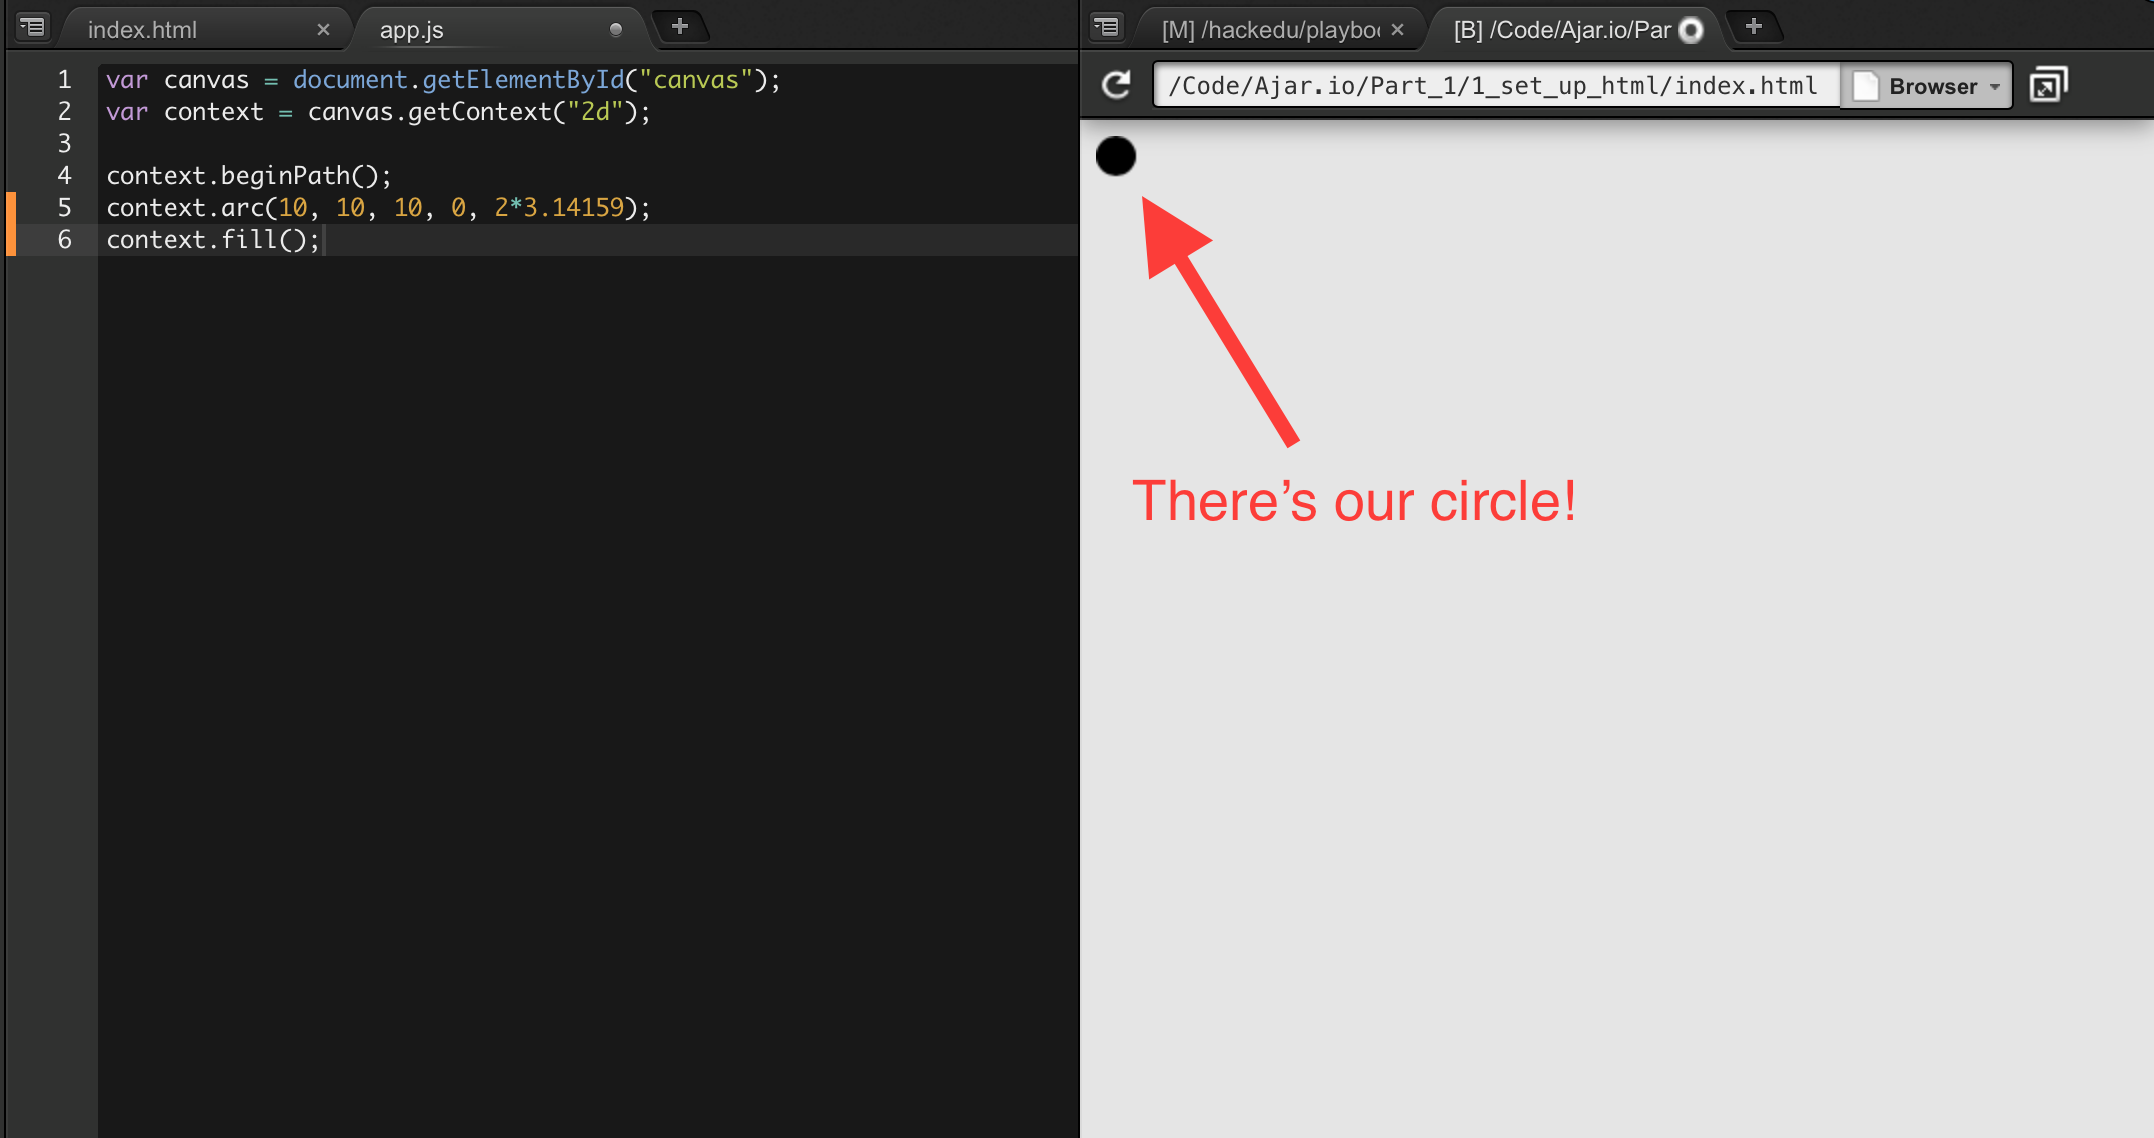
Time to draw a circle! Open your index.html file and from the menu bar click
Preview > Live Preview File (index.html).

Now each time you save changes to your HTML or JavaScript your site will refresh
to reflect the changes. Remember to save changes by going to File > Save.
Write the following lines at the end of your app.js file:
context.beginPath()
context.arc(10, 10, 10, 0, 2 * 3.14159)
context.fill()
You should have something that looks like this.
Understanding The Code
context.beginPath()- Any shape on the canvas is considered a path. You need to call this function before beginning to draw a new shape. In this case we are starting to draw a circle.
context.arc(10, 10, 10, 0, 2*3.14159)- This function creates an arc. An arc that ends where it starts forms a circle. The function takes a lot of arguments (the items separated by commas) so let's look at each one. The order of the arguments goes as follows:x, y, radius, startAngle, endAngle.
- The
xandy(both 10 in this case) indicate where to position the center of the arc. The top left corner of the canvas is considered (0, 0). Try moving the circle to a different location by changing thexandy.
- The
radius(also 10) determines the radius of the arc. Try making the circle a little larger by changing theradius.
- The
startAngle(0) determines at what angle the arc should start. The angle is measured in radians. Briefly, 0 radians = 0 degrees and 2π radians = 360 degrees.
- The
endAngle(2*π) determines at what angle the arc should end. If theendAngleis 2π radians, or 360 degrees, more than thestartAngle, the arc loops back into itself and forms a circle. Try making a semi-circle by changing theendAngle.
context.fill()fills the shape with a solid color. In this case the color is black.
Let's add some color! For this we write the following line directly above the
context.fill function:
context.fillStyle = 'cyan'

Woah! Our circle is now cyan.
Understanding the code
The
fillStyleis a variable that determines the color that is used to fill the shape. Many colors are available, so try some on your own (likepapayawhip).
When you've finished exploring, change the arguments of the context.arc
function to the following:
x: 250y: 250radius: 40startAngle: 0endAngle: 2*3.14159
Your website should now look like this:

Congrats!
You've finished Part 1!

Part 2
Welcome to part 2 of the Ajar.io workshop!
To recap, in part 1 you learned about:
-
JavaScript variables: used to store data values. Declared using the
varkeyword. You can make variables like this:var x = 10 * 2 var name = 'Bogdan' -
Drawing on the canvas: the HTML
<canvas>element is used to draw graphics, on the fly, via scripting (usually JavaScript). You obtain the drawing context of the<canvas>element by calling the function (more on what that means today)getContext("2d")of the<canvas>element. You use the drawing context to draw shapes on the canvas.
In this part you will learn about functions.
What are functions?
In part 1, you wrote all your code outside of any functions. This means that your code runs from top to bottom. This was okay for a simple task such as displaying one circle on screen. For more complex scenarios we will need functions.
A JavaScript function is a block of code designed to perform a particular task.
A function looks like this:
function name() {
  // code to be executed goes here <-- That is a comment
}
A JavaScript function is defined with the function keyword, followed by a name
and a set of parentheses (). The code to be executed by the function is placed
inside curly brackets: {}.
You "run" a function (the code inside of it) by "invoking" the function.
You use an empty set of parentheses () to invoke the function. To invoke the
function name from above, you would write the code:
name()
The code contained within the curly brackets {} would then be executed.
Unlike the code in part 1, code contained in functions can be run multiple times.
Let's make another function.
function addOne(myNumber) {
  myNumber = myNumber + 1
}
This function's name is addOne.
But look! There's something inside of the parentheses. You can put parameters inside function parentheses. Parameters are values you can give to the function that the function can then use when executing it's code block.
In this function we give the function a number. The function can refer to this
number as myNumber.
The function proceeds to take the number (myNumber) and add one to it.
So how do we "invoke" this function? Like this:
addOne(5)
The function thinks of myNumber as a variable whose value is 5. It then
proceeds to run the code:
myNumber = myNumber + 1
Because myNumber is 5, you can think of the computer seeing the code like
this:
myNumber = 5 + 1
So myNumber becomes 6.
Using functions in Ajar.
Right now your code should look like this:
Index.html
<!DOCTYPE html>
<html>
  <head>
    <title>Ajar.io</title>
  </head>
  <body>
    <canvas id="canvas" width="500px" height="500px"></canvas>
    <script type="text/javascript" src="app.js"></script>
  </body>
</html>
App.js
var canvas = document.getElementById('canvas')
var context = canvas.getContext('2d')
context.beginPath()
context.arc(x, y, 40, 0, 2 * 3.14159)
context.fillStyle = 'cyan'
context.fill()
Let's modify our code to use functions. Go ahead and open your index.html file
and click on preview in the menu bar and then Live Preview File
(index.html). Now open your app.js file.

The first thing we want to do is to wrap these lines in a function:
context.beginPath()
context.arc(250, 250, 40, 0, 2 * 3.14159)
context.fillStyle = 'cyan'
context.fill()
We're going to make a new function called drawUserCell and place the lines
from above in it:
function drawUserCell() {
  context.beginPath()
  context.arc(250, 250, 40, 0, 2 * 3.14159)
  context.fillStyle = 'cyan'
  context.fill()
}

If you save the file now you'll see that there's no more circle on screen!
This is because we haven't "invoked" the function drawUserCell. Let's invoke
it. Type out the code below the drawUserCell function:
drawUserCell();

The circle is back!
Congrats!
You've finished Part 2!

Part 3
Now that you know about functions let's move on to something more exciting! In this part we will make the user's cell move.
This is how it's going to work:
- Get the position (x and y) of the mouse cursor over the screen by adding an
EventListnerformousemoveto the<canvas>element. - Clear what's currently drawn on screen by overlaying a rectangle over the entire screen.
- Draw the circle again this time at the new coordinates.
That's the order the computer will execute the code in, but not the order in which we'll write the code.
Draw Circle Based on Variable Values
In part 1 we hardcoded the x and y position of the circle:
context.arc(250, 250, 10, 0, 2 * 3.14159)
//          ^x  ^y
Since the position of our circle will change those values have to be variable. How do we make something variable? Oh right! Variables!
So we will make variables x and y and plop them at the start of our
JavaScript file, right under where we declare context:
var canvas = document.getElementById('canvas')
var context = canvas.getContext('2d')
var x = 250
var y = 250

We still set the x and y to 250 because that's what we want them to be by
default. But now we can change them.
Let's modify our circle-drawing code to use the variables.
Inside of the drawUserCell function, modify the context.arc function like
so:
context.arc(x, y, 40, 0, 2 * 3.14159)

Now the circle will be drawn at the values from x and y.
Save your file and open Live Preview. Your results should be the same.

Detect Mouse Movements
First we need to create a function that will be invoked each time the mouse is moved. Here it is:
function mouseMoved(mouse) {
  x = mouse.clientX
  y = mouse.clientY
}

Understanding The Code
- You declare a function called
mouseMovedthat takes one parameter,mouse.mouseis an object that contains two variables that we care about:clientXandclientY. These represent, respectively, the x and y coordinates of the mouse cursor in relation to the canvas.- You then set the variable
xequal to theclientXand the variableyequal to theclientY.
We detect mouse movements by adding an EventListner for mousemove to the
<canvas> element. The syntax looks like this:
canvas.addEventListener('mousemove' /*your function goes here*/)
Understanding The Code
This code will invoke a function that goes in place of the comment
/*your function goes here*/each time the mouse is moved.
Let's invoke the mouseMoved function each time the mouse is moved:
canvas.addEventListener('mousemove', mouseMoved)

Notice we do not invoke the
mouseMovedfunction ourselves (by writingmouseMoved()). Instead we simply tell theEventListnerto invoke the function for us each time it receives amousemoveevent.
Finally, let's draw a new cell each time the mouse is moved. To do this, we
simply invoke the drawUserCell function from within our mouseMoved
function:
function mouseMoved(mouse) {
  x = mouse.clientX
  y = mouse.clientY
  drawUserCell() // <== NEW
}

If you save now, you'll see the fruits of our labor.

Huh. That's strange. It looks like we've just recreated Paint. Although that's pretty cool, it wasn't what we wanted. We wanted one circle that moved with the mouse.
Why is this happening?
If you look at the code, you'll see that each time we move the mouse we draw a new circle at that location. We're forgetting to clear the canvas.
Clearing the canvas
Clearing the canvas is pretty easy. All we've got to do is to draw a rectangle over the whole canvas.
You could find the solution by googling "How to draw rectangle on canvas JavaScript", but I'll save you the hassle.
We draw a rectangle with the rect function of context.
The rect function accepts 4 parameters:
x- The x-coordinate of the upper-left corner of the rectangley- The y-coordinate of the upper-left corner of the rectanglewidth- The width of the rectangle, in pixelsheight- The height of the rectangle, in pixels
Since we know the canvas is 500px by 500px, making a rectangle that covers the whole thing looks like this:
context.rect(0, 0, 500, 500)
Remember from part 1 that before we draw anything we have to invoke the
beginPath function of context. We'll also want to give the rectangle a
color, so we will also set the fillStyle to white and finally invoke the
fill function.
Let's put all this into a function called clearCanvas:
function clearCanvas() {
  context.beginPath()
  context.rect(0, 0, 500, 500)
  context.fillStyle = 'white'
  context.fill()
}
Finally invoke this function each time the mouse is moved and before you draw the cell:
function mouseMoved(mouse) {
  x = mouse.clientX
  y = mouse.clientY
  clearCanvas() // <== NEW
  drawUserCell()
}
Your app.js should look like this:

Save your work and see the results!

Wonderful, we have a moving cell!
Congrats!
You've finished Part 3!

Part 4
In this part you will learn to give your cell's movements a velocity. That means that the cell won't always be where your cursor is, instead it will follow your cursor.
Let's recap
In Part 3 you learned about functions. Remember that functions are self-contained blocks of code. They can receive input - In the form of parameters.
This is how we wrapped the code used to draw the user's cell into a function
called drawUserCell:
function drawUserCell() {
  context.beginPath()
  context.arc(250, 250, 40, 0, 2 * 3.14159)
  context.fillStyle = 'cyan'
  context.fill()
}
And this is how we invoked the function drawUserCell:
drawUserCell()
Planning it out
What we want to do: add a velocity to the cell's movements.
How do we even approach that? It goes something like this:
- Create an infinite loop that calculates the position of the cell 60 times a second. If you're familiar with video games you might recognize 60 times a second as 60 frames per second or 60 fps. More in a bit.
- For each frame, move the cell closer to the mouse location by a given amount.
Setting up the drawScreen function
We're now going to create a new function called drawScreen. This function will
be run 60 times every second forever.
The goal of this function is to redraw the cell closer to where the mouse is.
To redraw the cell we have to:
- Invoke the
clearCanvasfunction - Invoke the
drawUserCellfunction
Additionally we will invoke a function called calculatePosition before
drawUserCell. This function will calculate the new position of the cell after
1/60th of a second (one frame).
First though, let's set up the function named drawScreen:
function drawScreen() {
  clearCanvas()
  drawUserCell()
  setTimeout(drawScreen, 1000 / 60)
}
Understanding The Code
We create a function named
drawScreen. This function has no parameters (the parentheses are empty).
setTimeout(drawScreen, 1000/60)- This is the magic sauce. ThesetTimeoutfunction is what let's ourdrawScreenfunction repeat 60 times a second. It works by taking a function - The first parameter - And running it after a specified delay, in milliseconds - The second parameter.It's often useful to run through your code as if you're the computer. So let's do that. Pretend like the
drawScreenfunction just got invoked.
drawScreenfunction gets invoked- we clear the canvas with the
clearCanvasfunction- we draw the user's cell with the
drawUserCellfunction- we use the
setTimeoutfunction to invoke thedrawScreenfunction after a delay of (1000 / 60) milliseconds. Since 1000 milliseconds is equal to 1 second, thedrawScreenfunction will be invoked in 1/60th of a second.- the
drawScreenfunction gets invoked. WE'RE AT STEP 1 AGAIN! (the process repeats forever).
Now, let's modify the mouseMoved function so it doesn't do what we just made
the drawScreen function do. Namely, let's delete these lines from the
mouseMoved function:
clearCanvas()
drawUserCell()
Lastly, let's replace the invocation of drawUserCell at the end of the
app.js file with an invocation of drawScreen:

Now if we save the file and preview our work, we'll see exactly what we had before. Note though that we have what we had before even though we took a very different approach to get the same result.
**Running through the code
Let's quickly go through what the computer does when it executes our code:
- Variables (
xandy) and functions (drawScreen,drawUserCell,clearCanvasandmouseMoved) are declared.- The
mouseMovedfunction is made to run each time the mouse is moved:canvas.addEventListener('mousemove', mouseMoved)
- The
drawScreenfunction is invoked and begins it's infinite loop.At this point our program is in a stable state. The
drawScreenfunction will continue looping. It will redraw the circle each frame at the same position so it won't look like anything is changing. Until…*The mouse is moved!*
- The
mouseMovedfunction is invoked.- The
xandyare set to the coordinates of the mouse.- The next time the
drawScreenfunction loops (at max in 1/60th of a second), it will clear the canvas (clearCanvas) and invoke thedrawUserCellfunction.- The
drawUserCellfunction draws another circle centered atxandy. (Thexandyare now the coordinates of the mouse).- A new circle appears where the mouse is.
Great, let's now actually add velocity.
Setting up the variables for the calculatePosition function
For this section it's fundamental to understand this basic concept:
We want x and y to slowly become equal to the coordinates of the mouse,
instead of immediately as we've done so far.
The way we do this is by increasing or decreasing x and y each frame to get
them closer to the mouse's position.
We will need to create three variables at the top of the app.js file:
var mouseX = 250
var mouseY = 250
var velocity = 2
The important part is that mouseX and mouseY will always be equal to the
current position of the mouse. velocity will determine how fast the cell moves
(a higher velocity will make the cell go faster).
To make mouseX and mouseY instantaneously equal to the position of the
mouse, you must update the variables in the mouseMoved. So let's switch from
updating x and y to updating mouseX and mouseY:
function mouseMoved(e) {
  mouseX = e.clientX
  mouseY = e.clientY
}
The if-else statement
The calculatePosition will teach us a fundamental programming concept: the
if-else statement.
It looks like this:
if (3 > 2) {
  // code to run if condition is true
} else {
  // code to run if condition is false
}
The "condition" is held within the parentheses. For now we will just use basic
math operations like the > (greater than sign).
Since 3 is greater than 2, the condition is true and the code inside the if
statement runs.
Let's try another one:
var x = 1

if (x > 2) {
  // code to run if condition is true
} else {
  // code to run if condition is false
}
As you can see, the condition can contain variables too, not only numbers.
Since x is 1 and 1 is not greater than 2, the condition is false and the
code inside the else statement executes.
Setting up the calculatePosition function
The time has finally come! Let's give our cell some velocity!
Here's the code:
function calculatePosition() {
  // For the x-axis
  if (mouseX > x) {
    x = x + velocity // mouse is to the right of the ball
  } else {
    x = x - Velocity // mouse is to the left of the ball
  }

  // For the y-axis
  if (mouseY > y) {
    y = y + velocity // mouse is under ball
  } else {
    y = y - Velocity // mouse is above ball
  }
}
Understanding The Code
Although this code may look intimidating, it's not hard at all — promise.
function calculatePosition()- We declare a function calledcalculatePosition.
if (mouseX > x)- The code in theifstatement will run if the x value of the mouse (mouseX) is greater than (>) the x value of the circle (x). Your goal is to getxcloser tomouseXso whenmouseXis larger you must increasex. And that's exactly what you do:
x = x + velocity
else- The code in theelsestatement will run if the condition is false. in this case the condition is false ifmouseXis less than (<)x. WhenmouseXis less thanxwe must reducexto get it closer tomouseX. And that's exactly what you do:
x = x - Velocity
The same explanations apply to the y-axis code.
Note: it is not entirely accurate that the opposite of
mouseX > xismouseX < x. In fact the wiggling you'll see in a minute is partly due to this approximation. Use this hint for Challenge #1.
Invoking the calculatePosition function
Remember what the purpose of writing the calculatePosition function was? It
was so that we can calculate the position of the cell once every frame.
Where can we do things once per frame (every 1/60th of a second)? Oh right! In
the drawScreen function.
So let's invoke calculatePosition in the drawScreen function. Note that it
has to be before you invoke the drawUserCell function because
drawUserCell will use the position calculated by the calculatePosition
function:
function drawScreen() {
  clearCanvas()
  calculatePosition() // <== NEW
  drawUserCell()
  setTimeout(drawScreen, 1000 / 60)
}
Your app.js should look like this:

Save your work and preview your results!

Our cell has velocity!
Part 5
In this lesson you will add food at hardcoded positions. You will also learn about JavaScript arrays.
This is how it's going to work:
- Create an array to hold the positions of the food
- Modify the
drawUserCellfunction to work for any circle (i.e. food and the user cell). - Draw the food at the positions held in the array during the
drawScreenfunction.
What are arrays?
The Array object is used to store multiple values in a single variable.
You can store strings:
var cars = ['Saab', 'Volvo', 'BMW']
numbers:
var lotteryWinners = [23, 6, 25, 9, 15]
or anything else.
Array indexes are zero-based: The first element in the array is 0, the second is 1, and so on.
To access the 2nd element of the cars array we can do this:
var secondElement = cars[1] // <-- THE VALUE WILL BE "volvo"
Store food positions in an array
Let's create an array named foodPositions at the top of the app.js file.
This array will contain an array of an (x, y) coordinate pair for each food
position. Yep, that's right. An array can contain other arrays.
This is what a coordinate pair array will look like:
;[30, 100]
This pair represents the location (30, 100) where x is 30 and y is 100.
Here's the array we're going to make:
;[
  [30, 20],
  [400, 90],
  [60, 317],
  [300, 268]
]
We want to store this array in a variable named foodPositions:
var foodPositions = [
  [30, 20],
  [400, 90],
  [60, 317],
  [300, 268]
]
Generalizing (abstracting) the drawUserCell
We now want to "generalize" (more accurately abstract) the drawScreen
function to draw any type of circle, not just the user's cell.
Let's remember how we draw a circle.
context.arc(x, y, radius, startAngle, endAngle)
Since all circles will have the same startAngle and endAngle, the only
parameters we will need to change are x, y and radius.
We'll first start off by changing the name of the drawUserCell function to
drawCircle:
function drawCircle() {}
Next we'll add some parameters:
function drawCircle(circleX, circleY, radius) {
  context.beginPath()
  context.arc(circleX, circleY, radius, 0, 2 * 3.14159)
  context.fillStyle = 'cyan'
  context.fill()
}
Finally change the invocation of the old drawUserCell inside of drawScreen
to invoke drawCircle instead:
drawCircle(x, y, 40)
Lastly, below that invocation (which draws the user cell), we are going to draw the food:
drawCircle(foodPositions[0][0], foodPositions[0][1], 10)
drawCircle(foodPositions[1][0], foodPositions[1][1], 10)
drawCircle(foodPositions[2][0], foodPositions[2][1], 10)
drawCircle(foodPositions[3][0], foodPositions[3][1], 10)
Preview your work! We have food!
Your code should look like this:
var canvas = document.getElementById('canvas')
var context = canvas.getContext('2d')
var x = 250
var y = 250
var mouseX = 250
var mouseY = 250
var velocity = 2
var foodPositions = [
  [30, 20],
  [400, 90],
  [60, 317],
  [300, 268]
]

function drawCircle(cellX, cellY, radius) {
  context.beginPath()
  context.arc(cellX, cellY, radius, 0, 2 * 3.14159)
  context.fillStyle = 'cyan'
  context.fill()
}

function clearCanvas() {
  context.beginPath()
  context.rect(0, 0, 500, 500)
  context.fillStyle = 'white'
  context.fill()
}

function calculatePosition() {
  // For the x-axis
  if (mouseX > x) {
    x = x + velocity // mouse is to the right of the ball
  } else {
    x = x - Velocity // mouse is to the left of the ball
  }

  // For the y-axis
  if (mouseY > y) {
    y = y + velocity // mouse is under ball
  } else {
    y = y - Velocity // mouse is above ball
  }
}

function drawScreen() {
  clearCanvas()
  calculatePosition()
  drawCircle(x, y, 40)
  drawCircle(foodPositions[0][0], foodPositions[0][1], 10)
  drawCircle(foodPositions[1][0], foodPositions[1][1], 10)
  drawCircle(foodPositions[2][0], foodPositions[2][1], 10)
  drawCircle(foodPositions[3][0], foodPositions[3][1], 10)
  setTimeout(drawScreen, 1000 / 60)
}

function mouseMoved(e) {
  mouseX = e.clientX
  mouseY = e.clientY
}

canvas.addEventListener('mousemove', mouseMoved)
drawScreen()
Congrats!
You've finished Part 5!

More coming soon…