

Join Hack Club Horizons! Ship your projects and fly to your first hackathon →
In this workshop, we will talk about how to display 3D Models and show them in AR (Augmented Reality) inside an HTML webpage using EchoAR.
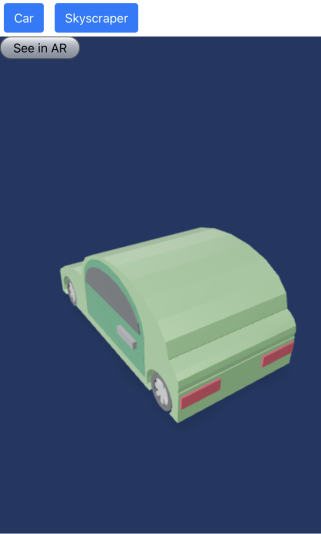
The Final Project will look like this.
Here's the Live Demo and Final Code
Prerequisites
You should have a basic understanding of:
- HTML
- CSS
- JavaScript
Setup
Setting up Environment on Repl.it
Repl.it is a great online IDE to let you make this project. Repl.it is not mandatory but it is what I will be using throughout this workshop.
To create your repl, go to https://repl.it/languages/html. You may need to sign up, so you can use any of the options there to sign up.
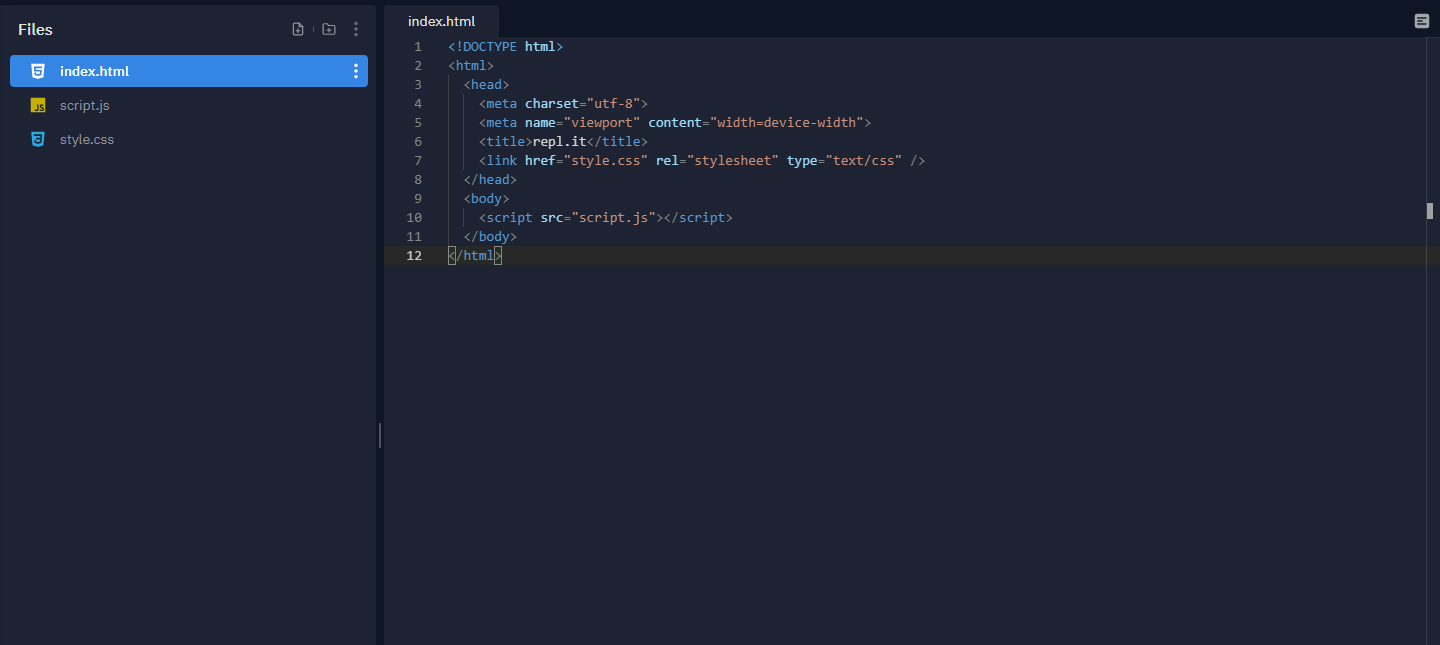
After a few seconds you should see this page.
Learning the Default Files
HTML File
Let's first start looking at the default index.html file.
At the top of the file we have <!DOCTYPE html>. This line helps tell the browser that this is an HTML file. We then have the <html> and <head> tag. Inside the <head> tag we will add our imports.
CSS/JS Files File
In the <head> tag of your HTML, you should see these lines.
<link href="style.css" rel="stylesheet" type="text/css" />
<script src="script.js"></script>
This is linking the style.css file and the script.js file to your index.html file.
Setting up EchoAR Account and Uploading Models to EchoAR
EchoAR Website is a platform where you can store your 3D models and all the relevant formats for different platforms. You can sign up at their website, and you should be good to go under the "Individual (Free)" plan.
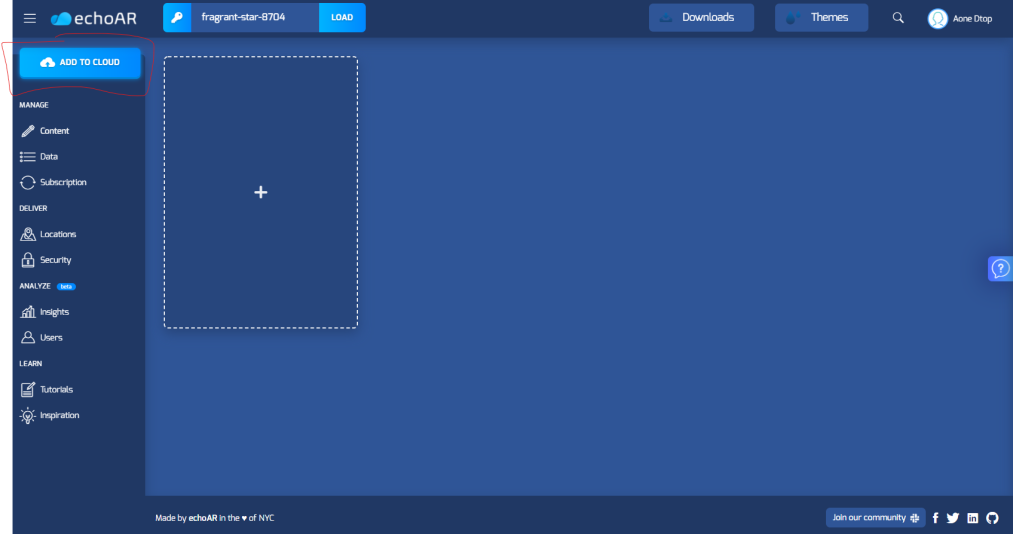
Once you sign up, you can click on the "Add to Cloud" button in order to add a 3D model to EchoAR.
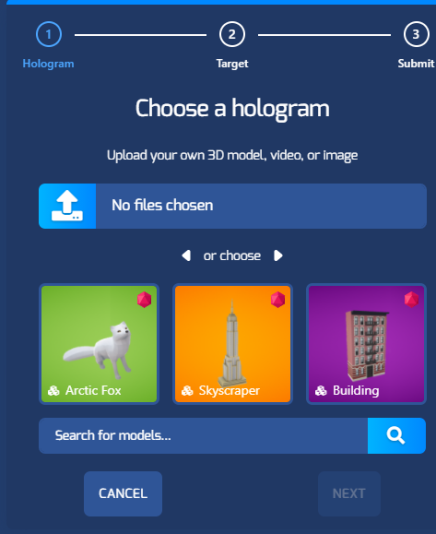
You can choose one of their premade models or upload your own 3D Model (as GLB File) and select the target as "Anywhere".
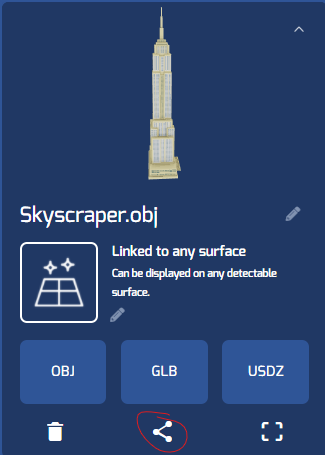
Then, click the share icon and go to the link on your keyboard.
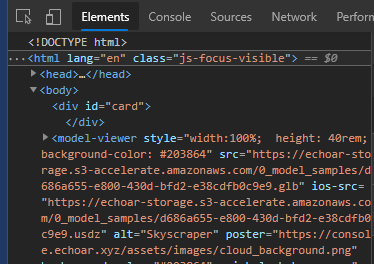
Next, inspect the page s with "Inspect Element" so we can get the model links
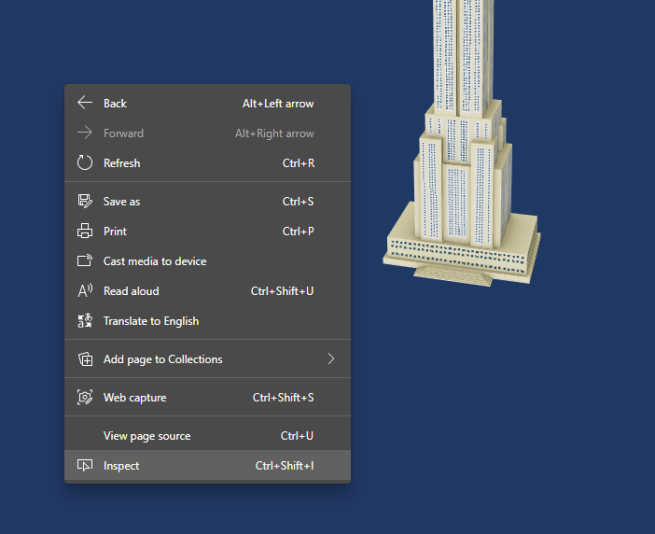
Go to the Elements tab and look for the modal-viewer element and copy the src and ios-src (you may have to open up the body element to find the modal-viewer element). We need to get the ios-src as ios phones need a different file to run.
Repeat this for all the models that you want in your application.
Creating the HTML
First, we need to import some scripts people have made in order to use AR and make it compatible with different browsers and devices. These imports go at the end of the head tag. In addition, we import Bootstrap in order to easily style our website.
<link
  rel="stylesheet"
  href="https://stackpath.bootstrapcdn.com/bootstrap/4.3.1/css/bootstrap.min.css"
  integrity="sha384-ggOyR0iXCbMQv3Xipma34MD+dH/1fQ784/j6cY/iJTQUOhcWr7x9JvoRxT2MZw1T"
  crossorigin="anonymous"
/>
<!-- Our own custom scripts -->
<script defer src="./script.js"></script>

<!-- Edge/Firefox WebComponent Support -->
<script src="https://unpkg.com/@webcomponents/webcomponentsjs@2.1.3/webcomponents-loader.js"></script>
<!-- Intersection Observer polyfill -- better performance Safari/IE11 -->
<script src="https://unpkg.com/intersection-observer@0.5.1/intersection-observer.js"></script>
<!-- Improves Resize Behavior for non-chrome browsers -->
<script src="https://unpkg.com/resize-observer-polyfill@1.5.0/dist/ResizeObserver.js"></script>
<!-- Polyfill for full Screen to fully support AR -->
<script src="https://unpkg.com/fullscreen-polyfill@1.0.2/dist/fullscreen.polyfill.js"></script>
<!-- Magic Leap support -->
<script src="https://unpkg.com/@magicleap/prismatic/prismatic.min.js"></script>
<!-- Removes focus from some input types -->
<script
  src="https://unpkg.com/focus-visible@5.0.2/dist/focus-visible.js"
  defer
></script>
<!-- Loads modal viewer for modern browsers -->
<script
  type="module"
  src="https://unpkg.com/@google/model-viewer/dist/model-viewer.js"
></script>
<!-- Loads modal viewer for old browsers -->
<script
  nomodule
  src="https://unpkg.com/@google/model-viewer/dist/model-viewer-legacy.js"
></script>
The main imports here are the last two imports which gives us a Web Component called model-viewer. You can read more about what a Web Component is and the model-viewer Web Component specifically here. This Web Component allows us to display 3D models in the browser. In addition, it also works with AR on Android using ARCore and works with AR on IOS using ARKit.
Inside the body tag we add the model-viewer Web Component which displays our 3D Model. Inside the model-viewer we have a button which will be displayed on compatible devies and will allow the user to see the object in AR (the slot and ar-button settings help display it). We use the classes btn and btn-primary as bootstrap gives the stylings for them.
<model-viewer
  quick-look-browsers="safari chrome"
  camera-controls
  auto-rotate
  ar
  unstable-webxr
  preload
  shadow-intensity="1"
  loading="eager"
  id="modal-viewer"
>
  <button slot="ar-button" id="ar-btn" class="btn btn-primary">
    See in AR
  </button>
</model-viewer>
On the model-viewer we set some properties, here are what they each do:
quick-look-browsersAlows you to launch on IOS with both Safari and Chromecamera-controlsEnables the user to control the model (ie. move it around/rotate it)auto-rotateAutomatically rotates the modelarEnables the use of AR on the modelunstable-webxrEnables AR Experiences using the device's webXR APIpreloadEnables preloading of the modelshadow-intensityTurns on shadows for the modelloadingLoads the model immediatly (since it is "eager")idsets an id that we can use to access it from the JS and control its styling in the CSS
You can learn about more properties of the model-viewer on their documentation.
Above this, we can have some buttons which can be used to switch models. In addition, we will make the function switchModel used in the onclick when we work on the javascript.
<button class="btn btn-primary" onclick="switchModel('car')">Car</button>
<button class="btn btn-primary" onclick="switchModel('skyscraper')">
  Skyscraper
</button>
A bit of styling
Inside the style.css file, we can add a bit of styling to make our site look better. First, we can tell our modal viewer to use the full screen and give it a background color.
#modal-viewer {
  width: 100%;
  height: 40rem;
  background-color: #203864;
}
We can also give the buttons some margins so they are a bit spread out.
.btn {
  margin: 5px;
}
Connecting EchoAR models to the website using JavaScript
First, we want to get the modal-viewer element from the DOM (Document Object Model) Document and put it into a variable so that we can change the sources of the modal viewer.
var modalviewer = document.getElementById('modal-viewer')
Next, we want to create an object, or key-value store, containing the sources for each of our models. Here is an example with the sources for a Skyscraper and Car Object I have uploaded to echoAR. For each model we store the src, ios-src, and alt. You can add more models by adding a new block in the models object. You can learn more about javascript objects here.
var models = {
  skyscraper: {
    src:
      'https://echoar-storage.s3.us-east-2.amazonaws.com/0_model_samples/d686a655-e800-430d-bfd2-e38cdfb0c9e9.glb',
    iosSrc:
      'https://echoar-storage.s3.us-east-2.amazonaws.com/0_model_samples/d686a655-e800-430d-bfd2-e38cdfb0c9e9.usdz',
    alt: 'Skyscraper'
  },
  car: {
    src:
      'https://echoar-storage.s3.us-east-2.amazonaws.com/polished-math-8279/c40af116-f3b3-4d3e-b442-b767f7bb6070.glb',
    iosSrc:
      'https://echoar-storage.s3.us-east-2.amazonaws.com/polished-math-8279/50cda243-ccd3-4628-b1bf-14ecd3263cbd.usdz',
    alt: 'Car'
  }
}
Now, we create a function to switch the model shown in the model-viewer. Model, is a string passed into the function with the name of the model we want to display (eg. skyscraper). We get the data for the relevant model by using models[model], and then get the use the setAttribute function on the modalviewer to set the src, ios-src, and alt attributes of the modal viewer.
function switchModel(model) {
  //Set ios source
  modalviewer.setAttribute('src', models[model].src)

  //Set ios source
  modalviewer.setAttribute('ios-src', models[model].iosSrc)

  //Set alt text
  modalviewer.setAttribute('alt', models[model].alt)
}
Finally, we can set a default model by calling the switchModel function and specifying our default model.
switchModel('car')
TinkerCAD Models
You can also create your own models and show it off on your website.
Go to tinkercad.com
Then click Join Now. You can then use your Google account and make an account.
You should then see this screen.
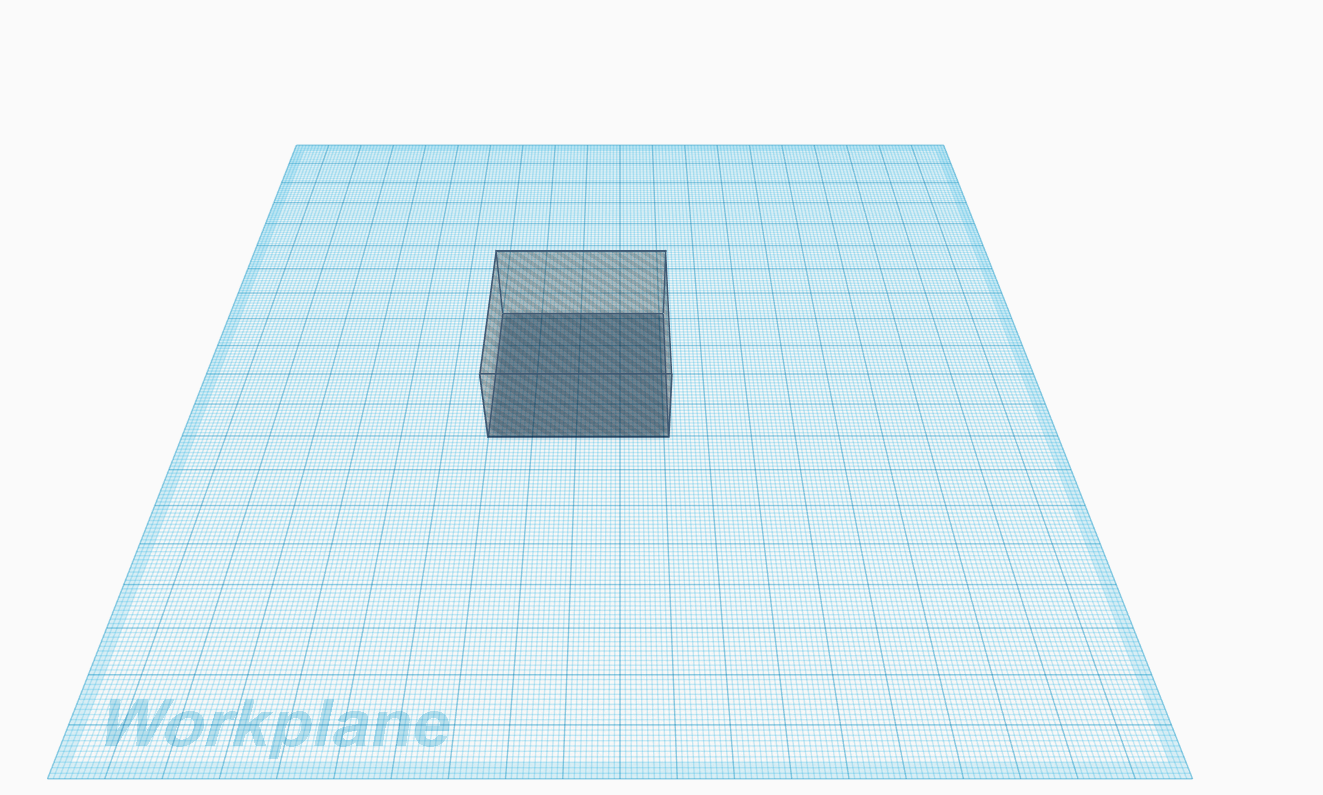
Then click Create New Design. Here I created a simple box model. You can make anything you want.
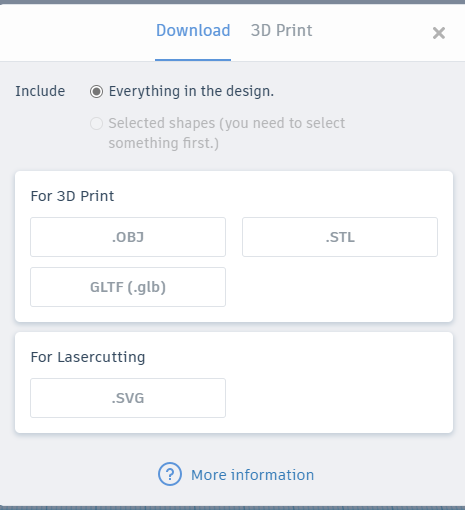
After you're done with your model click the export button on the top right.

Then pick the .glb option and download it.
Now that you have downloaded your model, you can upload your model to EchoAR by following the instructions in the Setting up EchoAR Account and Uploading Models to EchoAR section.
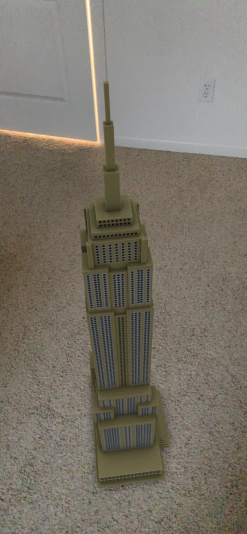
Finished Product
Voila!! You finished! If you are a little confused with something, please feel free to dm me on the HackClub Slack, @aadit.

Hacking
Here are some things which you can do:
-
Switch the AR Model every 10 seconds. Here's an example of one I made.
-
Make a function that would switch the model randomly. Here is the code for mine.
-
Create an
AddButton, to add 3D Models from the frontend. Here's an example of mine.
Once you have made your own hack of this project, share it in #ship channel on the HackClub slack, or dm it to me @aadit. I would love to see your cool project!