

Join Hack Club Horizons! Ship your projects and fly to your first hackathon →
In this workshop, we're going to use React Hooks to create a random color scheme generator.
Here's the live demo and source code
Prerequisites
You should have basic knowledge about both React.js as well as some of the new ES6 features in JavaScript.
You should know some React Fundamentals like:
If you are familiar with these, let’s get going.
React Hooks API
Previously, Class components were the only way to define a component that has its own state, and lifecycle methods. Functional components of React, which were light and more flexible, are limited in functionality.
React Hooks enable us to use state and other React features, like lifecycle methods and event handlers, without writing a class component.
There are many benefits of using Functional components. They include:
- Easier to read, test, and debug.
- Have better performance.
- More reusable.
Note: Hooks don’t work inside class components. But you can use them instead of writing class components in React.
Setup
For writing code, we will be using Repl.it. Repl.it is an online code editor which we can use to code in many different languages without any installations.
To get started, open the starter repl and click on the Fork button. The starter repl contains 'create-react-app' installed. I also added some basic styles so that we can concentrate completely on React.
Click the Run button to start the live-server (it’ll take a moment to get running the first time). After running successfully, you'll see Hello world! on the webpage.
Let's start creating.
The Color Component
Navigate to the src folder. Inside, create a file called Color.js. In here, you'll write a component that will be used to display the colors on the page. Add the following code:
import React from 'react'

export default function Color() {
  return (
    <div className="container">

    </div>
  )
}
This is a basic react functional component that renders a div element with the class of container. Don't forget to include classes to the elements throughout the project. All the styles are prewritten.
Now let's create some elements that contains our colors. But what colors? We'll give them random colors later.
The functional components can accept arbitrary inputs (called “props”) and return React elements describing what should appear on the screen.
Add a prop colors which will be an array, which we will get from other components.
export default function Color({ colors = [] }) { // <–– accepts an array as prop
  // code goes here
}
Then we will loop through the array with map().
The final component will look like this:
import React from 'react'

export default function Color({ colors = [] }) {
  if (!colors.length) return null
  return (
    <div className="container">
      {colors.map((color, i) => ( // <–– map method
          <div
            key={i}
            className="color"
            style={{ background: color }}
          ><span className="name">{color}</span></div>
      ))}
    </div>
  )
}
The above component gets the colors array as a prop from another component and returns an array of div elements with a background color. Each element contains the respective backgroundColor in form of hex code. You can observe that a key is given to every element for its identity.
Now we finished writing our Color.js component. But nothing will appear on the screen without rendering this component.
Getting a random color
Open the App.js component. To get a random color we will use a package called randomcolor. It is a small library that returns some random colors. The package is already installed in the starter repl.
Let's import Color.js and randomColor into our App.js component. Add these lines of code to the App component.
import Color from './Color' // <–– importing Color.js
import randomColor from 'randomcolor' // <–– importing random color package
We will create an array of colors and change the colors when you click the button. Create a button with a class of btn inside the div.
<button className="btn">Change!</button>
We use the state to update the colors array every time you click the button.
The State Hook - useState()
Using the useState() API, you can create a new state variable, and have a way to alter it. useState() accepts the initial value of the state item and returns an array containing the state variable, and the function you call to alter the state. Since it returns an array we use array destructuring to access each item.
You can add as many useState() calls as you want, to create as many state variables as you want. Just make sure you call it in the top level of a component (not in an if statement or in any other block).
Now create two states count and colors using useState.
You have to import the useState() hook from the react library.
import React, { useState } from 'react' // <—— importing useState
import Color from './Color'
import randomColor from 'randomcolor'

export default function App() {
  const [count, setCount] = useState(0) // <—— state variables
  const [colors, setColors] = useState([])

  return (
    <div>
        <button className="btn">Change!</button>
    </div>
  )
}
Let's create a function change() which changes count when the button is clicked. We use the function setState() for changing the count.
const change = () => {
  setCount(prevCount => prevCount + 1) // <—— changing count on clicking
}
Add event onClick to the button and call the function.
<button className="btn" onClick={change}>Change!</button>
At this point, our App.js looks something like this:
export default function App() {
  const [count, setCount] = useState(0)
  const [colors, setColors] = useState([])

  const change = () => {
      setCount(prevCount => prevCount + 1) // <—— changing count on clicking
    }

  return (
    <div>
        <button className="btn" onClick={change}>Change!</button>
    </div>
  )
}
The Effect Hook - useEffect()
The useEffect() API accepts a function as argument. The function runs when the component is first rendered, and on every subsequent rerender/update. React first updates the DOM, then calls any function passed to useEffect(). All without blocking the UI rendering even on blocking code, unlike the old componentDidMount and componentDidUpdate, which makes our apps feel faster.
It is very effective adding external API class, or event-listeners inside this hook. Since the useEffect() functions are run on every subsequent re-render/update, we can tell React to skip a run, for performance purposes, by adding a second parameter which is an array that contains a list of state variables to watch for. React will only re-run the side effect if one of the items in this array changes. If the second parameter is not defined, the useEffect() runs infinitely.
Now we can set the colors of our project using useEffect(). We get a base color from randomColor() and make a color scheme using an the color API.
The following getColors() function creates elements in the colors array. We can get different color schemes using our baseColor from the color API.
Make sure that you import useEffect from React.
import React, { useState, useEffect } from 'react' // <—— importing useEffect

const getColor = () => {
    const baseColor = randomColor().slice(1);
    fetch(`https://www.thecolorapi.com/scheme?hex=${baseColor}&mode=quad&count=5`)
    .then(data => data.json())
    .then(data => {
      setColors(data.colors.map(color => color.hex.value))
    })

    ...
  }
Explanation: The above code fetches the data from the URL. The fetch method in JavaScript provides an easy, logical way to fetch resources asynchronously across the network.
In the above code, We will get a random color in hex code like #FA6745 when we use randomColor(). But the color API takes only the code without #. So we use the slice() method to remove # from the color.
const baseColor = randomColor().slice(1)
Then we will call this function inside our useEffect() hook. As described, we use count as a second parameter for recalling the hook every time the count changes.
useEffect(getColor, [count])
Every time you click the button, count changes. As the count changes, the useEffect() runs, getColor() is executed, and the colors array changes.

You cannot see any colors on the screen. Let's now render the Color.js component inside for the App.js component and pass the colors array as a prop.
import React, { useState, useEffect } from 'react'
import Color from './Color'
import randomColor from 'randomcolor'

export default function App() {
  const [count, setCount] = useState(0)
  const [colors, setColors] = useState([])

  const change = () => {
      setCount(prevCount => prevCount + 1)
    }

  const getColor = () => {
    const baseColor = randomColor().slice(1);
    fetch(`https://www.thecolorapi.com/scheme?hex=${baseColor}&mode=quad&count=5`)
    .then(data => data.json())
    .then(data => {
      setColors(data.colors.map(color => color.hex.value))
    })
  }

  useEffect(getColor, [count])

  return (
    <div>
        <Color
          colors={colors}
        />
        <button className="btn" onClick={change}>Change!</button>
    </div>
  )
}
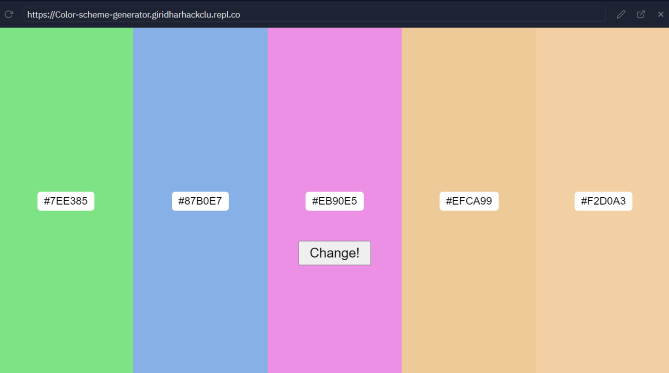
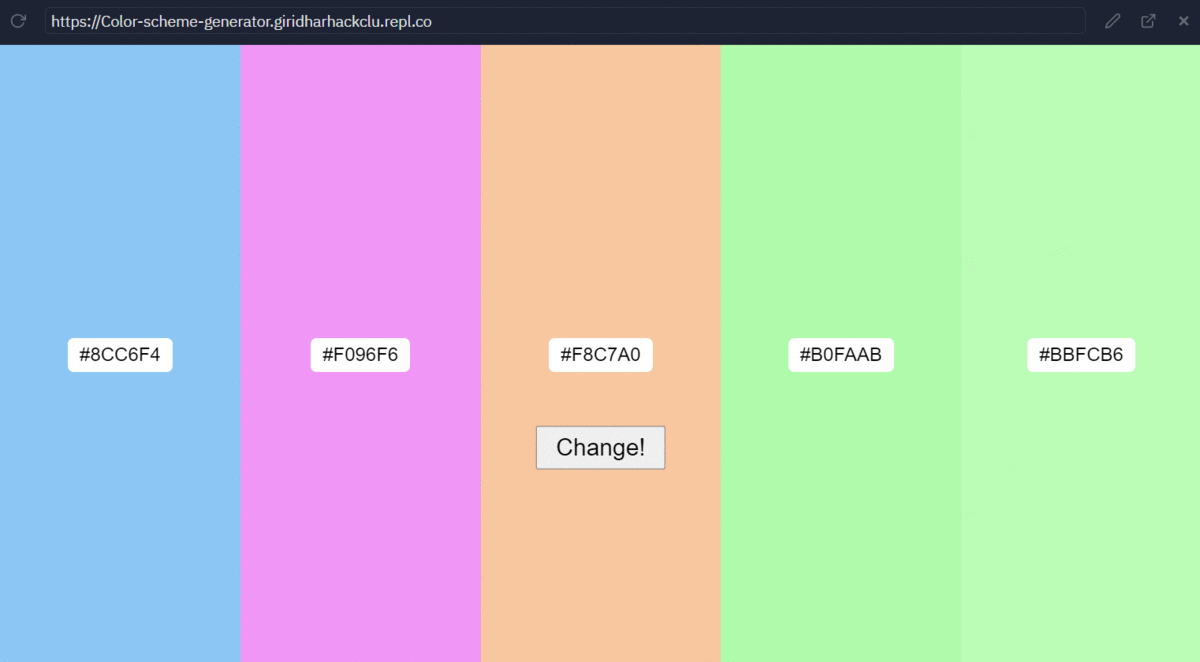
Click on the Run button to see the output. You can see random color-schemes on the webpage. When you click the Change button the colors will change.
You can check the final code here.
The useState() and useEffect are the most used hooks in react. There are other additional hooks and are rarely used.
You can also create custom hooks.
Hacking
- You can customize the styles in
index.cssand make the project mobile responsive. - Create different types of schemes. Refer the color api for more types of schemes.
- You can add some more functionality to this app, like getting the
baseColorfrom the user. - You can also create a custom function which generates a random color, without using randomcolor package.
Make use of your creativity, use hooks in your projects, and share it with me on slack as @Giridhar.
Inspiration
-
Example-1: Demo. Source code.
Monochrome Color Schemes - It generates monochrome color-schemes. Same as the project in this workshop, but with different types of schemes. -
Example-2: Demo. Source code.
Analogic Color Schemes - It generates Analogic-complement color-schemes. Same as the project in this workshop, but with a different type of scheme. -
Example-3: Demo. Source code.
In this example, the randomcolor package is not used. Instead created a custom function to generate random colors.
Use the power of React Hooks in your next React project. Hope you enjoy this workshop!