

Join Hack Club Horizons! Ship your projects and fly to your first hackathon →
In this workshop, you will learn how to use:
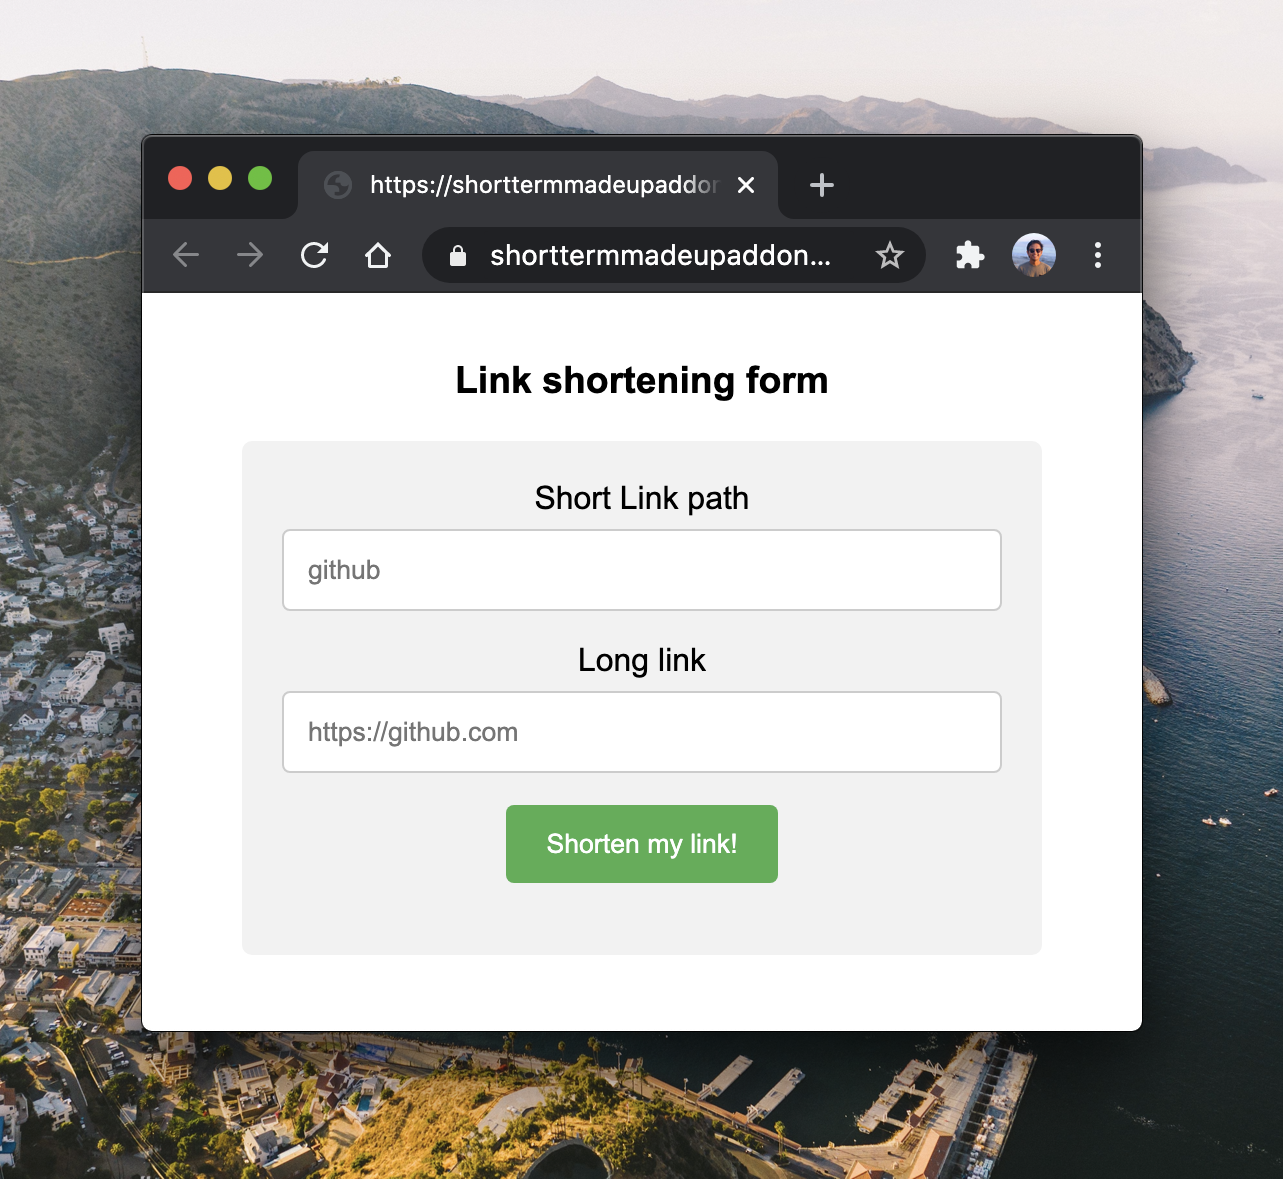
You will be making an API that allows someone to submit a form with a link and in return, get a personalized custom short link to use in replacement of that initial long link.
Difficulty/interest level: This workshop is designed for all level hackers in HTML and Javascript. You'd be interested in this if you want to learn how to use Express JS or build a link shortener. You do not need to buy a domain for this as you can use repl.it's custom project domain.
Average time for completion: You can complete this in 15-20 minutes. You will need the following tools:
- Repl.it online coding platform
- Custom domain (optional)
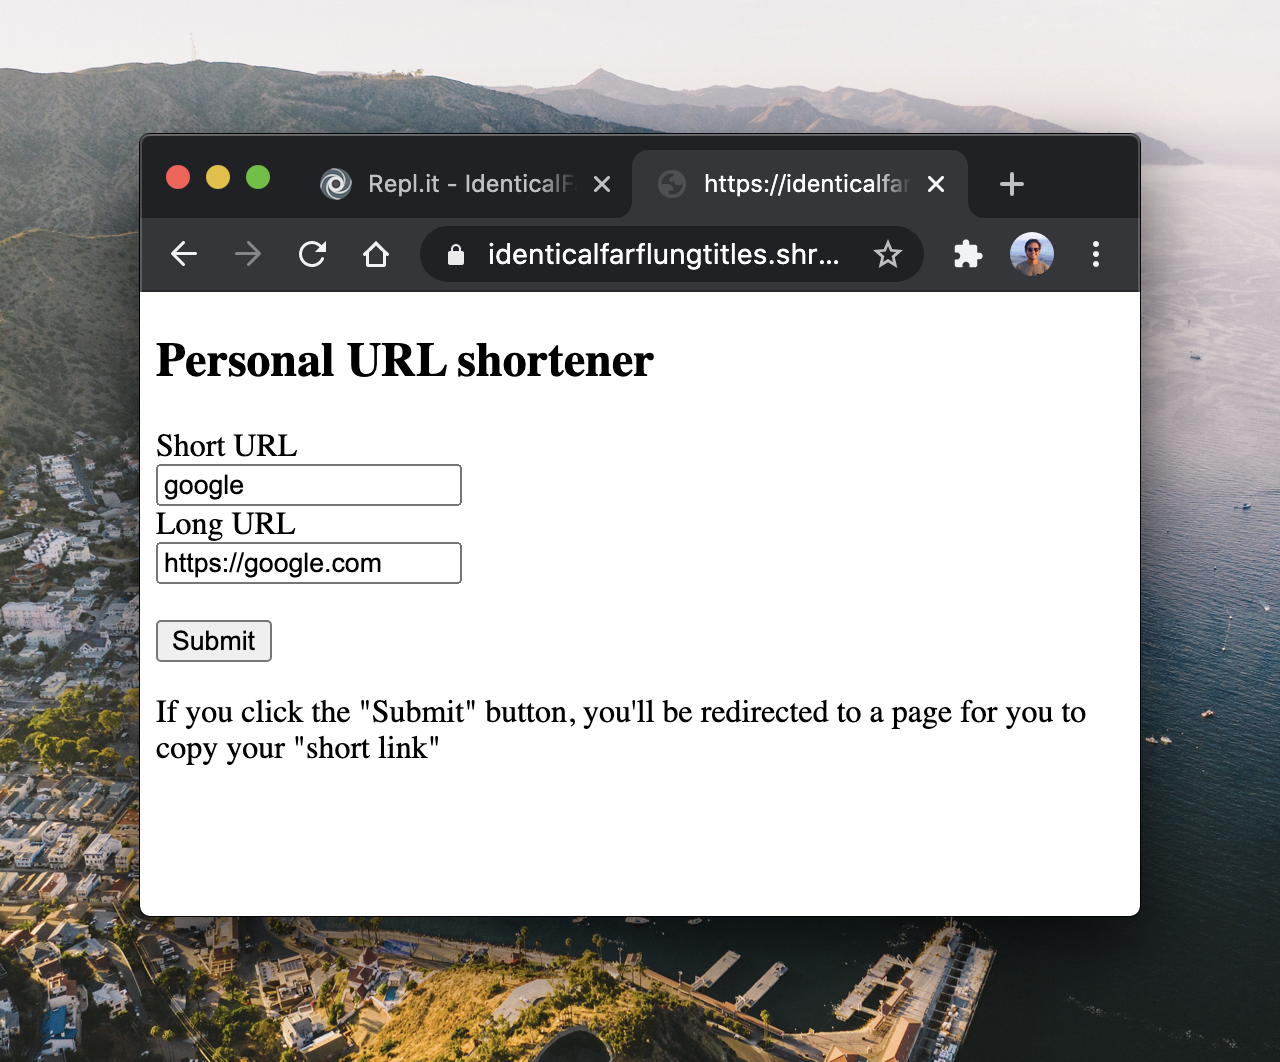
Demo: Test out what we'll be making on this demo! Enter the shortened URL path you want to access and enter the longer link. Then click submit and it will give you your shortened link!
Link to code: https://repl.it/@ShreyGupta1/IdenticalFarflungTitles
Link to site: https://IdenticalFarflungTitles.shreygupta1.repl.co/new
First steps
-
We are going to use repl.it, an online collaborative coding platform for this project. A "Repl" is essentially an environment for your programming environment.
-
Click the "Start coding" button on the top right
The website will look a little like this:
-
-
Choose "NodeJS"
- It will take you a new Repl environment with a NodeJS configuration. NodeJS is essentially Javascript for servers. It will allow us to manage our database and frontend web pages easily.
-
Delete all of the code existing in
index.js. Your Repl environment should only have 1 file and no code in that file. We will be starting from scratch. Here is a reference of how everything should look like: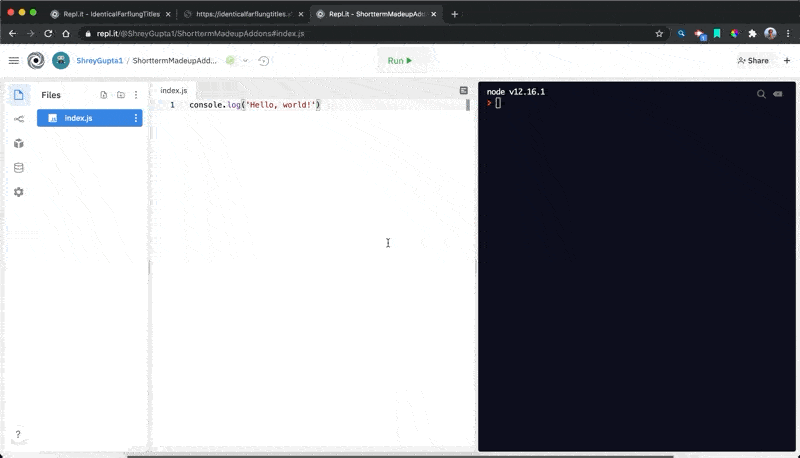
Down to business
Let's start planning our code! My favorite quote from a mentor is "Programming is 80% hacking and 20% planning. Good code is always preceded by great planning." We should figure out how this link shortener is going to work.
Creating new links:
- User makes a form submission to our server
- We add that data to our database
Accessing the short links:
- User goes to the link they want on our domain
- We check the database for the "path" they're on.
- A "path" is whatever comes after the
.comor.org, etc
- A "path" is whatever comes after the
- Based on what the database gave back, we should redirect them to their long link
What kind of modules do we need to import?
- Express, of course
- Repl's built-in key:value database
- A
pathmodule, so we can get the location of the user and send them to where they need to go!
Server-side code
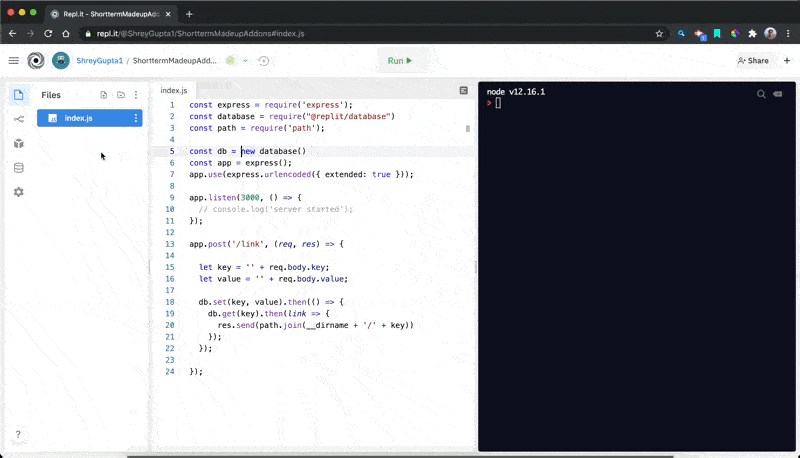
Inside of your index.js, let's start importing the modules you need! Add this to the file:
const express = require('express');
const database = require("@replit/database")
const path = require('path');
These are the same modules mentioned above. You don't need to do any package.json tasks or install any NPM modules. Repl.it will do all of that for you.
Now, let's add the initial starting code that lets us access the module data.
const db = new database()
const app = express();
app.use(express.urlencoded({ extended: true }));

app.listen(3000, () => {
  // console.log('server started');
});
Things to learn from this:
dbwill let us initialize our databaseappwill initialize our Express appapp.use()is function that will let our server understand what kind of data we're accepting. In our case, we will take URL-encoded data.app.listen()will start the Express server on the port 3000 (the standard port for web interfaces)
Let's starting making our first function. This is going to be a "create new link" function, one that our frontend will send data to. A key-value database is exactly how it sounds. A key is like the name of a file and a value is the contents of that file. The files don't have to be large, they can hold any type of computer data (numbers, booleans, strings/chars, JSON objects, or null).
Add this code, this is the first function. Try analyzing how the data is aligned and moving through:
app.post('/link', (req, res) => {

  let key = '' + req.body.key;
  let value = '' + req.body.value;

  db.set(key, value).then(() => {
    db.get(key).then(link => {
      res.send(path.join(__dirname + '/' + key))
    });
  });

});
Let's go through this code, after all, you should always know what you're coding!
- You can do
app.get()to force a GET request on the end-user's network requests. In our case, people will POST data to this function. They will do it to/link(the path for this function). - We are forcing the variables
keyandvalueto be strings by doing'' + req.body...; - There are a few functions that repl.it gives you in their built-in database. We're using
db.set()anddb.get(). Respectively, set will add/replace a key:value combo and get will get a value from a key value.res.send()returns the data that the user's network requests sees.path.join()will combine the current host path with the key.
Notice how this code is formatting. There will be no response until the data is set in the database.
Frontend code
Let's create the form where people can submit now. HTML is a web interface language that can be used to make up web pages. So far, everything we've created is on the server, it's time for the user to be able to input new things for our app.
- As outlined by the GIF above, create a new file called:
new.html. This will let us create a new link for our app. - HTML is written in tags. There are three tags needed for forms:
<form>,<input>, and<label>.You can add your own paragraph or heading tag to be descriptive, but that is all up to you. - Each tag in HTML has different attributes.
<input>tags have a specific attribute calledtypewhich allows you to set what kind of input you'll accept. Notice how this changes in the code below.
Here is the code for new.html. It's important to analyze exactly what's going on with clear details on how the data is obtained and moving.
<form action="/link" method="POST">
  <label for="key">Short URL</label><br>
  <input type="text" id="key" name="key" value="google"> <br>
  <label for="value">Long URL</label> <br>
  <input type="url" id="value" name="value" value="https://google.com"> <br> <br>
  <input type="submit" value="Submit">
</form>
I always prefer to add my own descriptive tags and HTML/body initialization tags to ensure the least amount of long term errors. If you want to do that, check out the Repl with the final code: https://repl.it/@ShreyGupta1/IdenticalFarflungTitles#new.html
Note that we are POSTing data to /link (line 1 of new.html). This means we are using an HTTP POST request to send data to our Express server function.
Back to the backend!
Let's finish up our frontend code. Even though we have a new.html file, the user still needs to be able to access it. Our server works in functions and each function corresponds to a website path. Let's make a path for our frontend form. Add this to your index.js file, after everything you've added so far:
app.get('/new', (req, res) => {
  res.sendFile(path.join(__dirname + '/new.html'));
});
Try interpreting this code. Here's some tips:
- Based on what we know about the formatting of the functions we've coded in the past, GET and /new allow us to access /new on the web.
- What's going to show up on the webpage? We're going to send a file (the HTML one we just created) to the user. This will let them access the form on the same site.
Lastly, we need to handle what happens when a user opens a new page. This would be a page that isn't already defined (for example: both /link and /new have already been hard coded). We need to dynamically check the path requested and redirect accordingly. This is very similar to sending a new form because the two functions that we've created in the past all directly relate to this one. Add this at the bottom of everything you've coded so far:
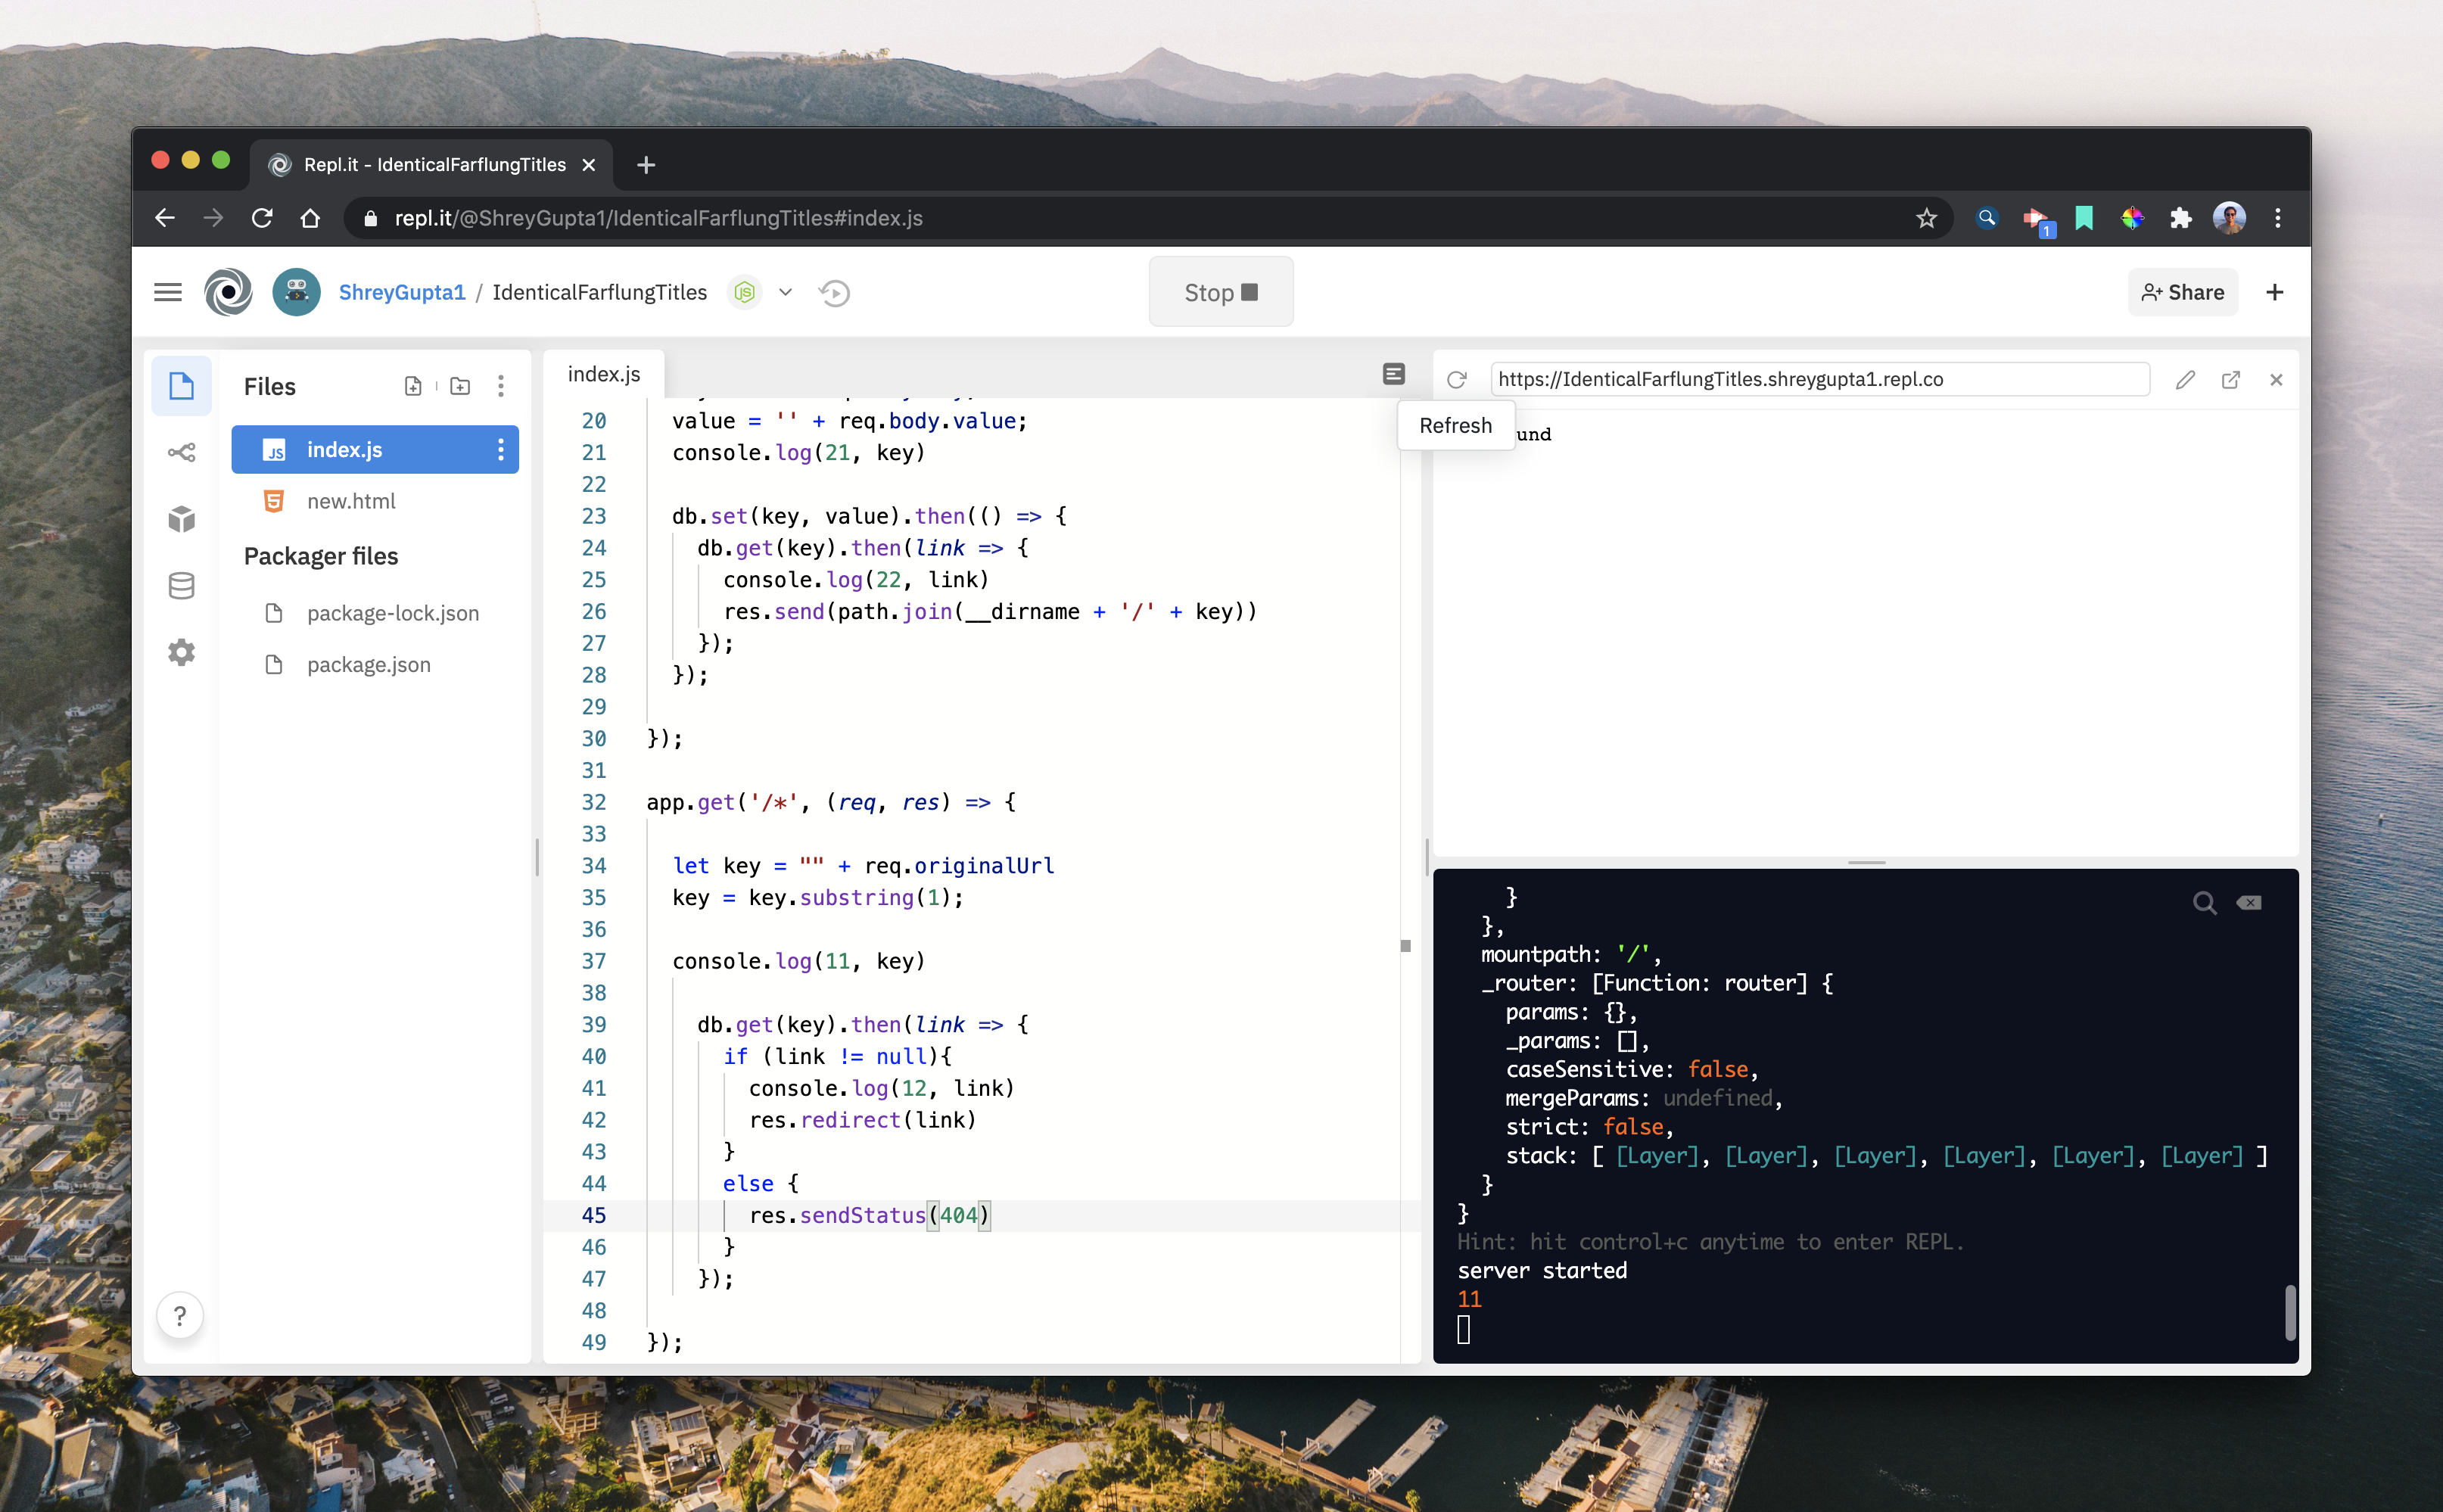
app.get('/*', (req, res) => {

  let key = "" + req.originalUrl
  key = key.substring(1);

  db.get(key).then(link => {
    if (link != null){
      res.redirect(link)
    }
    else {
      res.sendStatus(404)
    }
  });

});
Things to note:
- We're using a wildcard for the path name. This means that any path that isn't already defined will be assigned to this function.
- We're removing the first character from the string. This is because, using the built-in variable
originalUrlfor the path gives us a/in front of what we need. Since our database keys are not stored that way, we need to remove it. - Let's get from the database using the key and this can go two ways:
- If there is a valid link returned, let's go and redirect to it.
- If there isn't a valid link, let's return a
404error. This error is standard among all web interfaces to mean: "Sorry, this information is missing/cannot be found."
Your final code should look like this: https://rerpl.it/@ShreyGupta1/IdenticalFarflungTitles#index.js - If you click run, we should get a 404 error on the window because we haven't defined the root value.
Finishing touches
- You're almost done with your own custom link shortener! You can connect your own domain to it by following Repl.it's guide to going about that: https://docs.repl.it/repls/web-hosting
- You can get free domains online too! Check this discussion post on how to do so: https://repl.it/talk/learn/How-to-use-a-custom-domain/8834
- You can do to:
. repl.co/new - you should be able to access the new link creation form! - Make sure to click "Start" and "Stop" at the top as you make changes. Repl can sometimes lag and not completely update your app, even when the code is in line.
- Anytime you enter a link that has already been used, it will override it!
Extending the shortener
The point of having these workshops is for you to be able to extend this project. You learned how to do this now how are you going to hack this and make it your own. We want you to learn from this and build something ten, fifteen... a THOUSAND times bigger and better! Here are some ideas for you to get started:
-
Making the form (or even 404 page) look a little nicer, so it's more appealing to you and other users
-
Creating authentication for people to sign in using Netlify Identity or Firebase Authentication! People can have their own customized dashboards to view their links for your domain
-
Restrict people from creating new links on an existing path