

Introduction
Pac-Man is a famous video game featuring a yellow character roaming around a maze collecting different things along the way. In this workshop, you'll learn how to create your own Pac-Man game using the Python Freegames library.
Here's a demo of what we'll be making. You can see both the final code and test it out on this Repl environment: https://repl.it/@YashKalbande/Easy-Level
- NOTE: If you ever get lost, feel free to open the Repl above and see where the code is being placed. All the code explained in this workshop is in order of first line to last line :) Happy hacking and good luck!
We're going to be coding this using a principle called modular programming. This means we're going to be writing different functions that we will call at the end. A function is written by putting the function name, what parameters it needs, and then what happens with the parameters. Here's an example function:
def functionName(parameter1, parameter2):
	total = parameter1 + parameter 2
  return total
Now, whenever I call functionName, I will get the sum of its two parameters. You can call a function by just filling in the parameters:
sum = functionName(5, 6)
print(sum) #prints 11
Planning
Because this is a relatively complex project, we should plan out the functions and variables we are going to need. Think about what we might use for this project. What kind of actions are possible for a Pac-Man game? You can use a flow chart or write down on a piece of paper what we will need. Here is a list of things we need to be able to do:
- Create a map to our specification that will let the user know how to navigate through the game
- Enforce the Pac-Man (the user) to stay within that map
- Let the Pac-Man move. We will probably need two functions for this:
- Choosing a direction for the Pac-Man
- Letting the Pac-Man move in the specified direction
- Add different ghosts and dots into the game to spice it up
- Making sure initial placement of the ghosts and dots are random
- Scoreboard that updates based on how many dots the Pac-Man eats
Setting up our code!
For this workshop, we're going to be using an online code editor called Repl.it.
- Head over to Repl.it/languages/Python3
- This will create a new Python 3 Repl for you to use to code.
- Edit your new
main.pyfile with the following code:
from random import choice
from turtle import *
from freegames import floor, vector
- The code above essentially says the following:
- Import the
choicefunction from the modulerandom. This is a built-in Python module that gets a random value for us to use when spawning. - Add all the functions from the
turtlelibrary. Learn more about the Turtle library here. It is a way to implement graphics in Python projects - Get the
floorandvectorfunctions from thefreegameslibrary. The freegames library is a basic module with built-in functions that do standard game tasks like moving around and setting a playing field.
- Import the
- Next, we’ll want to declare and initialize all of our global variables:
state = {'score': 0}
path = Turtle(visible=False)
writer = Turtle(visible=False)
aim = vector(5, 0)
pacman = vector(-40, -80)
ghosts = [
    [vector(-180, 160), vector(5, 0)],
    [vector(-180, -160), vector(0, 5)],
    [vector(100, 160), vector(0, -5)],
    [vector(100, -160), vector(-5, 0)],
]
- Take a moment and try to understand what the code above is trying to say. The best way to interpret code is by turning it into plain English. Here are some helpful tips:
- The
statevariable is in a JSON object with the first key beingscore - Both
pathandwriteruse theturtlelibrary we imported earlier. Respectively, they are used to draw the game map and to update the score. - We imported
vectorearlier. This will let us choose the direction and placement of initial objects. This is assigned using a two-dimensional (x, y) axis. Think of a graph... aimsets the direction of movement for the Pac-Man as (5, 0). This means that we are setting a speed of 5 to the right on the axis.- We are also using it in an array called
ghosts, this will spawn the ghosts at each corner of our game and set their speed at a default of 5.
- The
Planning the maze
Now comes the fun part! We want to plan what the maze is going to look like for the user. We do it by drawing tiles in an array.
0represents an empty space and1represents a filled space- For the purpose of this workshop, we'll be using a 20x20 grid. To make it easy visually, let's code this with the same idea in mind.
You can use your own map, or use this sample. Add this code to the bottom of your main.py file:
tiles = [
    0, 0, 0, 0, 0, 0, 0, 0, 0, 0, 0, 0, 0, 0, 0, 0, 0, 0, 0, 0,
    0, 1, 1, 1, 1, 1, 1, 1, 1, 1, 1, 1, 1, 1, 1, 1, 0, 0, 0, 0,
    0, 1, 0, 0, 1, 0, 0, 1, 0, 1, 0, 0, 1, 0, 0, 1, 0, 0, 0, 0,
    0, 1, 1, 1, 1, 1, 1, 1, 1, 1, 1, 1, 1, 1, 1, 1, 0, 0, 0, 0,
    0, 1, 0, 0, 1, 0, 1, 0, 0, 0, 1, 0, 1, 0, 0, 1, 0, 0, 0, 0,
    0, 1, 1, 1, 1, 0, 1, 1, 0, 1, 1, 0, 1, 1, 1, 1, 0, 0, 0, 0,
    0, 1, 0, 0, 1, 0, 0, 1, 0, 1, 0, 0, 1, 0, 0, 1, 0, 0, 0, 0,
    0, 1, 0, 0, 1, 0, 1, 1, 1, 1, 1, 0, 1, 0, 0, 1, 0, 0, 0, 0,
    0, 1, 1, 1, 1, 1, 1, 0, 0, 0, 1, 1, 1, 1, 1, 1, 0, 0, 0, 0,
    0, 1, 0, 0, 1, 0, 1, 1, 1, 1, 1, 0, 1, 0, 0, 1, 0, 0, 0, 0,
    0, 1, 0, 0, 1, 0, 1, 0, 0, 0, 1, 0, 1, 0, 0, 1, 0, 0, 0, 0,
    0, 1, 1, 1, 1, 1, 1, 1, 0, 1, 1, 1, 1, 1, 1, 1, 0, 0, 0, 0,
    0, 1, 0, 0, 1, 0, 0, 1, 0, 1, 0, 0, 0, 0, 0, 1, 0, 0, 0, 0,
    0, 1, 1, 0, 1, 1, 1, 1, 1, 1, 1, 1, 1, 0, 1, 1, 0, 0, 0, 0,
    0, 1, 1, 0, 1, 0, 1, 0, 0, 0, 1, 0, 1, 0, 1, 1, 0, 0, 0, 0,
    0, 1, 1, 1, 1, 0, 1, 1, 0, 1, 1, 0, 1, 1, 1, 1, 0, 0, 0, 0,
    0, 1, 0, 0, 0, 0, 0, 1, 0, 1, 0, 0, 0, 0, 0, 1, 0, 0, 0, 0,
    0, 1, 1, 1, 1, 1, 1, 1, 1, 1, 1, 1, 1, 1, 1, 1, 0, 0, 0, 0,
    0, 0, 0, 0, 0, 0, 0, 0, 0, 0, 0, 0, 0, 0, 0, 0, 0, 0, 0, 0,
    0, 0, 0, 0, 0, 0, 0, 0, 0, 0, 0, 0, 0, 0, 0, 0, 0, 0, 0, 0,

]
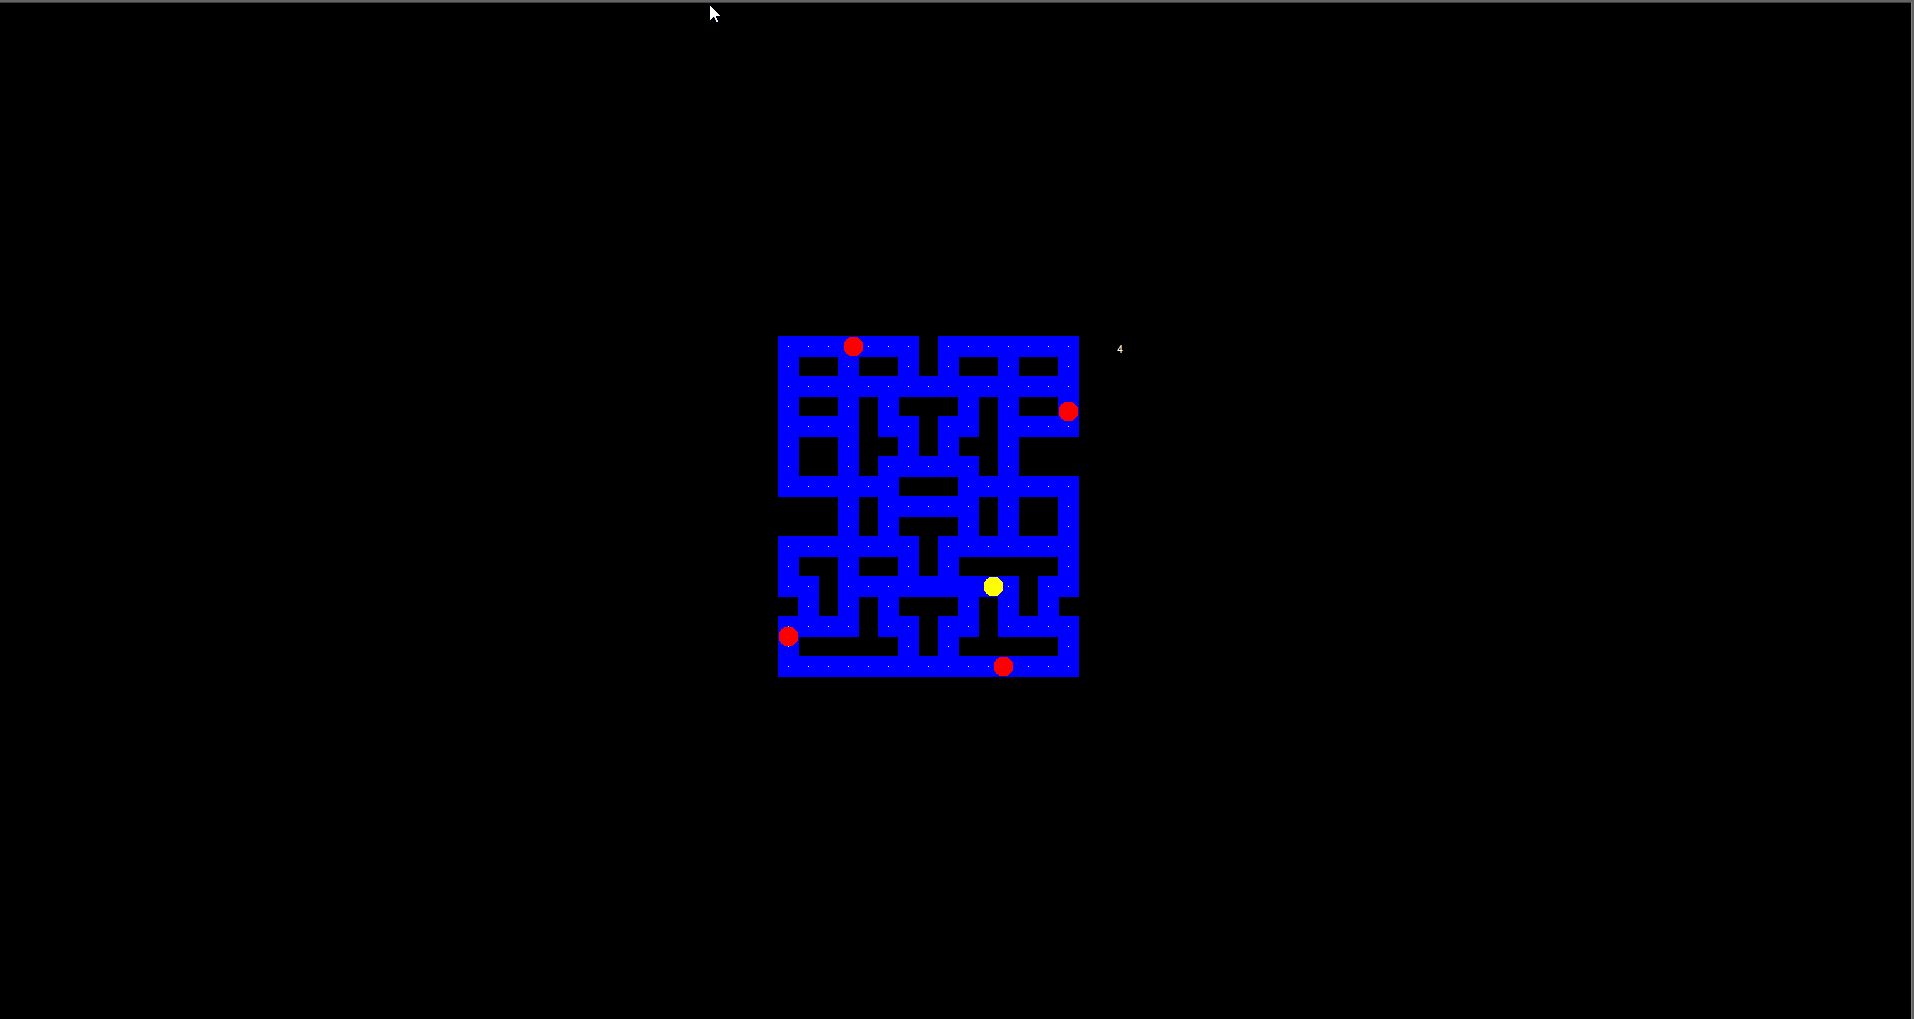
For reference, this is what the above sample code will look like, once we implement the correct functions to draw it on:

Drawing our maze
Now just because we see what the map looks like in the code, doesn't mean Python knows what it is. We need to use our turtle library to make bricks that follow the path we created. Add this code, which tells the library to follow the blueprint we made above.
def brick(x, y):
    path.up()
    path.goto(x, y)
    path.down()
    path.begin_fill()

    for count in range(4):
        path.forward(20)
        path.left(90)

    path.end_fill()
What to take away from this code:
- We are using the
pathfunction from theturtlelibrary. The function names are pretty standard and describe what direction it should draw in. - Take note of the parameters
(x, y). This means that we are getting a value and adding a brick in that spot.
The way that bricks work are by taking a smaller scale 20x20 grid and scaling it up. We don't want the user to only see a 20 pixel view, we are turning each pixel into a larger square.
Adding some physics!
We're going to add two physics principles into our code:
-
Offset - to make sure our Pac-Man returns back into the maze path, in case they run into the bricks we created.
def offset(point): "Return offset of point in tiles." x = (floor(point.x, 20) + 200) / 20 y = (180 - floor(point.y, 20)) / 20 index = int(x + y * 20) return index -
Validity - ensuring that our Pac-Man can't do anything suspicious and run through the bricks!
def valid(point):
    "Return True if a point is valid in tiles."
    index = offset(point)

    if tiles[index] == 0:
        return False

    index = offset(point + 19)

    if tiles[index] == 0:
        return False

    return point.x % 20 == 0 or point.y % 20 == 0
Both of those code blocks can be added to the bottom of your code.
Finishing the maze
We need to put all of our functions together to make our actual world look a little nicer than just a few code blocks laying around. We're going to make a new function called world that does the following:
- Uses the
brickfunction we coded earlier and goes along thetilesarray we coded as the blueprint. - Adds some color into our map
- You can choose any color you want, but for the purpose of the workshop, the sample will go with the standard Pac-Man colors (blue and black)
def world():
    Screen().bgcolor('black')
    path.color('blue')

    for index in range(len(tiles)):
        tile = tiles[index]

        if tile > 0:
            x = (index % 20) * 20 - 200
            y = 180 - (index // 20) * 20
            brick(x, y)

            if tile == 1:
                path.up()
                path.goto(x + 10, y + 10)
                path.dot(2, 'white')

    update()
- Notice the numbers that we use. In blueprint array we programmed earlier, we kept the dimensions 20x20 in mind. This is why you can see that we're using different mathematically expressions to calculate which line we're on.
- We're using a for loop to traverse through the array to add the array items one by one.
- If the value at a specific spot is
0, we'll add abrick(from the function we coded earlier). - If the value is
1, then we'll fill it in for the Pac-Man to walk through.
- If the value at a specific spot is
- Remember to be very careful about the indentation of each line — for example, make sure the
path.up()is lined up exactly under theifsyntax.
Moving the Pac-Man
We want our Pac-Man to be able to move through the world we created. We're going to create a new function called move that will allow the character to move. While coding, notice the different variables we're using and functions that correspond.
def move():
    writer.undo()
    writer.write(state['score'])
    clear()
    if valid(pacman + aim):
        pacman.move(aim)

    index = offset(pacman)

    if tiles[index] == 1:
        tiles[index] = 2
        state['score'] += 1
        x = (index % 20) * 20 - 200
        y = 180 - (index // 20) * 20
        brick(x, y)

    up()
    goto(pacman.x + 10, pacman.y + 10)
    dot(20, 'yellow')

    for point, course in ghosts:
        if valid(point + course):
            point.move(course)
        else:
            options = [
                vector(5, 0),
                vector(-5, 0),
                vector(0, 5),
                vector(0, -5),
            ]
            plan = choice(options)
            course.x = plan.x
            course.y = plan.y

        up()
        goto(point.x + 10, point.y + 10)
        dot(20, 'red')

    update()

    for point, course in ghosts:
        if abs(pacman - point) < 20:
            return
    ontimer(move, 100)
- NOTE: Our Pac-Man has no sense of direction yet. It's using the default
aimwe assigned earlier when we were initializing variables. At the moment, our Pac-Man is only programmed to go right, at a speed of 5. We'll add some direction in the next step. - The
writervariable we implemented at the beginning is being used here with theundo()andwrite()functions. These are built-in functions that come withTurtle. - As we go down further the code, we're checking if the movement is
valid. Remember those physics functions we made? This is where we're implementing it. A move isvalidwhen it doesn't involve touching a brick. - We're also utilizing the
ghostsarray with vectors we initialized before. This lets us have them in the game and move them around. - We're creating
dots(a function fromTurtle) that our Pac-Man will eat. We are ensuring they're being created dynamically as they are attached to the Pac-Man's moves. If the Pac-Man doesn't move, it won't spawn more dots. - Going a step further: If you want to take things a step further and introduce an animation, sound effect, or other prettiness factor, we would introduce it after
brick(x, y). Try addingprint(“PAC-MAN”)as an example.
Giving Direction to Pac-Man
We created a function that lets our Pac-Man move, but it doesn't know where to go. It only followed the direction that we provided to it in the aim variable. Let's create a function that lets our Pac-Man change that aim value, or in other terms, change it's direction. Add this code into the bottom of your code:
def change(x, y):
    if valid(pacman + vector(x, y)):
        aim.x = x
        aim.y = y
We first check if the direction is valid (we aren't inside of a brick or anything), then we set the aim we initialized at the start of the code.
The Final Stretch!
As we mentioned earlier, this game is coded using a principle called modular programming. This means that everything we code is in functions, now we can bring it together. We can call these functions by writing the function name and the parameters it needs in parentheses. This code block will put all the pieces together:
setup(420, 420, 370, 0)
hideturtle()
tracer(False)
writer.goto(160, 160)
writer.color('white')
writer.write(state['score'])
listen()
onkey(lambda: change(5, 0), 'Right')
onkey(lambda: change(-5, 0), 'Left')
onkey(lambda: change(0, 5), 'Up')
onkey(lambda: change(0, -5), 'Down')
world()
move()
done()
Congrats! You've just made your own Pacman game! 🎉
Things to note:
- These are all functions we created earlier, we are just putting the pieces together.
- The grid, as mentioned earlier, is scaled up to 420x420 (from 20x20). We use
turtle's built insetup()function to accomplish this. hideturtle(),listen(), andtracer(False)are all defaultturtlefunctions that will let us remove any unnecessary default items/features and enable us to listen for keystrokes.- We are picking up the user's keystrokes by using Python's built-in
onkey()function.
- We are picking up the user's keystrokes by using Python's built-in
Extending the game
Our version of Pac-Man is pretty basic. We are utilizing 2D vector graphics and Python’s turtle graphics library to draw shapes and dots on our screen.
- This art style is very much in-line with the look and feel of the original incarnation of the game in the 1980s.
- If you want to take the game a step further you could introduce graphical sprites, add more details to Pac-Man or ghosts like eyes, etc.
- You can design end numbers of levels for Pac-Man by doing changes in the
tilesvariable. Different color schemes, size, number of ghosts, etc.
You can also add other types of roadblocks into the app to make it more difficult, which usually which making the game more addictive: