

Join Hack Club Horizons! Ship your projects and fly to your first hackathon →
One of the most popular effects of modern web experience is the parallax effect. We are going to build a basic project to understand how the parallax effect works. To understand this workshop you will need to be familiar with HTML, CSS and JavaScript.
Here's the live demo, and source code of the project.
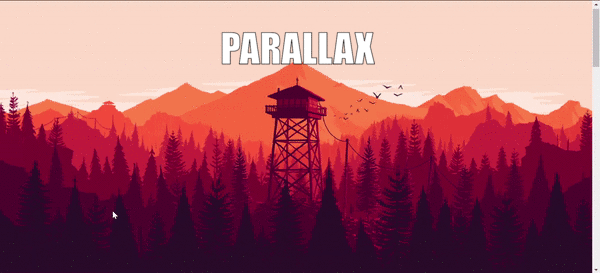
Parallax
Parallax movement is when things move at different speeds relative to each other. This effect can be used to create an illusion of depth. We will experience this effect in websites while scrolling a webpage. It's called Parallax scrolling.
The technique is popular in many places including video games, where it’s usually seen in the layered backgrounds.
But what exactly causes the illusion?
We know that objects at farther distances move with slower speeds than the nearer ones. As you scroll or do something to trigger the effect, you experience the illusion as elements move with different velocities.
Note: Parallax scrolling does not always work on mobile devices smartphones. However, you can use media queries to turn off the effect on mobile devices.
We can see how the parallax scrolling works in this example here.
^As you scroll, each of the layers moves at different speeds.
Advantages of Parallax Effect
If you want to make your website amazing, it's not enough to show static elements. You have to amaze your visitors and make them want to explore your site, otherwise they can leave fast. You have to show them some cool things and some short visual surprises. The Parallax effect makes it possible. Moving components on scrolling or on hovering will make them interested. You can create something interesting using parallax effect of your choice.
Getting started
Practically a parallax is composed of more than one layer in parallel, moving along on scroll at different speeds, giving us the feeling that they're at different distances.
Setup
We will use Repl.it to build this project.
Repl.it is an online code editor. It's similar to Google Docs, but has some important features that make it much better for typing code than a regular text editor.
Fork this repl and explore! here.
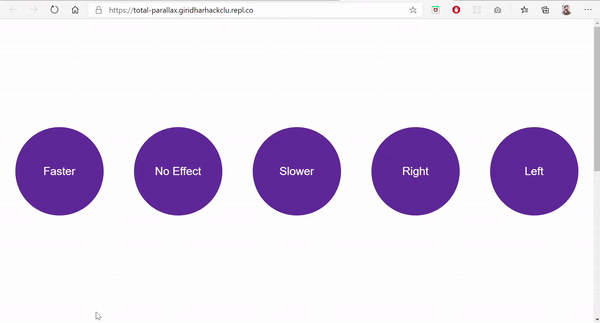
It contains three div elements with classes layer l1, layer l2 and layer l3 added with some basic styles.
<div class="layer l1">Faster</div>
<div class="layer l2">No Effect</div>
<div class="layer l3">Slower</div>
For applying parallax effect, the thing we need to do is select the layer and change it's speed while scrolling. That's it!
Let's start doing it!
Go to script.js and add the following function.
function parallax(layer, distance, speed) {
const item = document.querySelector(layer)
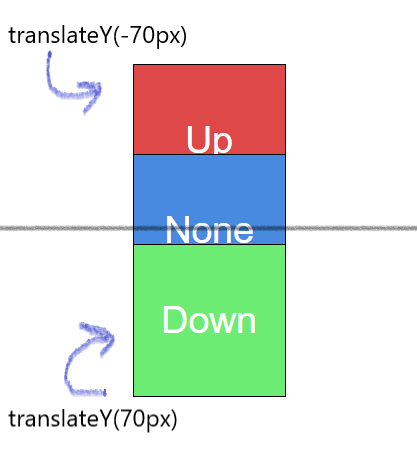
item.style.transform = 'translateY(' + -distance * speed + 'px)'
}
This function has three arguments.
-
layer- the layer you want to add parallax -
distance- how much we scroll -
speed- the required speed changeWe will add parallax for multiple layers. That is the reason we made a function to recall it for different layers. Then we will get the element(layer) required using
querySelector. You can use any JavaScript DOM selector as your wish. Then translate theY-offsetof the element using CSStransform: translateY();to change the speed of that layer. The positive value intotranslateY()translates downwards and negative value translates upwards. Discover more abouttranslateY()here.
addEventListener
Now call this parallax function while scrolling. Add an event listener scroll . The function given as argument to event-listener gets executed.
document.addEventListener('scroll', function () {
  // code here!
})
scrollY: The read-only scrollY property of the Window interface returns the number of pixels that the document is currently scrolled vertically. This value is subpixel precise in modern browsers, meaning that it isn't necessarily a whole number. You can get the number of pixels the document is scrolled horizontally from the scrollX property. - MDN web docs.
The parallax function is called inside the event-listener. Here, for this project we will select the layers with classes l1 and l3 from the document. The distance argument in parallax function is how much we scroll i.e., window.scrollY and you can give any value to the speed argument. The speed argument decides whether the layer moves faster(upwards) or slower(downwards).
Add the following code inside the event listener (in between the opening and curly braces of the above function).
parallax('.l1', window.scrollY, 0.5)
parallax('.l3', window.scrollY, -0.5)
For faster speeds the speed will be positive and for slower speeds it should be negative. Anyhow we have to make sure that translateY() is negative for the faster layer and positive for slower layer.
In the above code, we added faster speed to l1 and slower to l3. That means if you scroll 100px upwards, the faster layer scrolls 150px upwards and the slower layer scrolls somewhat about 50px.
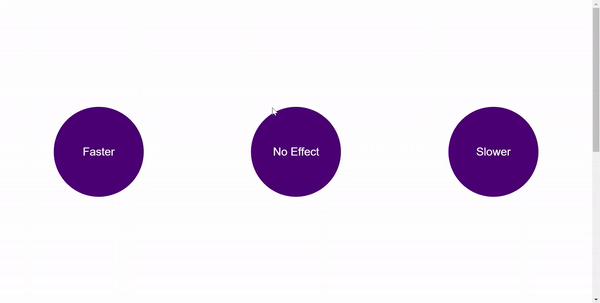
So finally check the output and scroll.
Your final page looks something like this.
Try changing the speed to 1, observe what happens to each layer and think why it happens.
Speed-1
In vertical parallax, when the speed is 1 both upwards and downwards, that means the layer gets translated with speed of scrolling.
The faster layer moves with double the speed of normal scrolling-speed. While, the slower layer will be fixed. Because while you are scrolling upwards it gets translated downwards with the same speed. So it appears as fixed in its position.
That's it! You can add any number of layers for the document and call the parallax function. This is the parallax effect.
These are the main basic principle of Parallax effect. You can modify the function parallax and get the result you want.
Let's try another method of applying parallax.
Horizontal Parallax
Now add another two div tags with classes layer l4 and layer l5 to index.html
<div class="layer l4">Right</div>
<div class="layer l5">Left</div>
In horizontal parallax, the elements in the page move horizontally as you scroll vertically.
Add the following function, to your script.js file , which causes horizontal motion.
function hrparallax(layer, distance, speed) {
  const item = document.querySelector(layer)
  item.style.transform = 'translateX(' + -distance * speed + 'px)'
}
The hrparallax function makes the layer translate along x-direction as you scroll vertically.
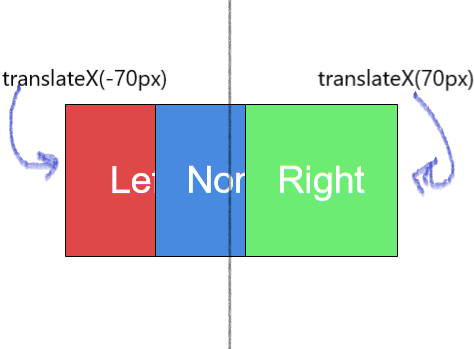
The positive value translates rightwards and negative value translates leftwards. Discover more about translateX() here.
Add the following code inside the event listener.
hrparallax('.l4', window.scrollY, -0.5)
hrparallax('.l5', window.scrollY, 0.5)
For rightward movement the speed will be negative and for leftward movement it should be positive. Here l4 moves rightwards and l5 moves leftwards.
Then your final page looks something like this.
That's it! You added both vertical-parallax and horizontal-parallax effects. Well done.
Hacking
You can create different parallax effects.
- In this workshop, I focused only on scrolling vertically. You can make use of
scrollXfor creating parallax while scrolling horizontally. - You can use
transform: translate(X,Y);ortransform: translate3d(X,Y,Z);for creating different effects.
You can add parallax-effect to your websites for creating better user experience and display your content more interactively.
Make use of your creativity and make different parallax effects. Also customise the styles. Share it with me on slack @giridhar, I'd love to here from you!
Inspiration
These are some projects made using parallax-effect.
- Example-1 demo. source code.
Real application of parallax effect. - Example-2 demo. source code.
Zoom on scroll - In this example, width of elements changes as you scroll. - Example-3 demo. source code.
Mouse-move parallax - As you move mouse-pointer, theinnerHeightand theinnerWidthof the elements changes.
Check this article for awesome another-level parallax examples
Hope you love this workshop! ✌️