Join Hack Club Flavortown! Ship your projects and earn free prizes →
In this workshop, we'll be building a dodging game using Sprig. The player will have to doge the falling obstacles to score points. Sprig is a JavaScript game engine that makes it easy for beginners and masters to make games, all in your browser.
Basic JavaScript knowledge is recommended for this workshop. If you're not familiar with Sprig, you can try making your first Sprig game to learn the basics.
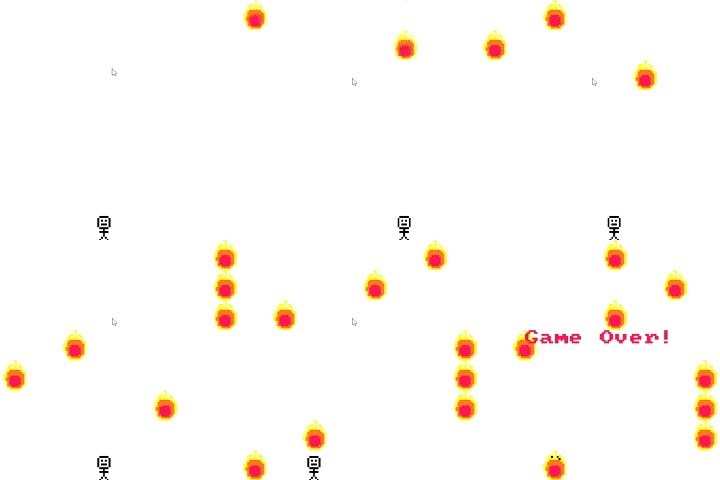
Here's what your game will end up looking like:

Curious? Check out the final game's code & play it!
1. Getting Started
Open up the Sprig Editor. Create a new game (menu > new game). This is where we'll be coding our game.
Let's start programming!
2. Making the sprites
We have to tell Sprig what our characters, players, and objects are. This is possible with sprites.
a) Defining the sprites
In our game, we'll be using two sprites: the player and the obstacles. Each sprite has a key, this is a single character that tells Sprig which sprite is which.
const player = "p";
const obstacle = "o";
pandoare assigned to our sprites,playerandobstacle, respectively.
b) Making art for the sprites
Add the following to your code.
setLegend(
  [obstacle, bitmap`...`],
  [player, bitmap`...`]

);
setLegend()will tell Sprig what image to display for each sprite. We put the obstacle on top as we want it to display above the player.
Click on the green bitmap text to open the pixel editor. Select colors and tools on the right to draw your sprites in the 16x16 area. Be creative with your design.
The bitmap is stored as a string. You can click on the arrow next to the line number to expand or hide it. Each character represents a pixel and its color.
Here's what I came up with.
setLegend(
    [player, bitmap`
................
................
................
.....00000......
....0.....0.....
....0.0.0.0.....
....0.....0.....
....0.000.0.....
....0.....0.....
.....00000......
.......0........
.....00000......
.......0........
.......0........
......0.0.......
.....0...0......`],
    [obstacle, bitmap`
.......66.......
........6.......
.....66.6.6.....
....66.66.66....
....666666.6....
...6699999966...
...69999999966..
..669999999996..
..669933339996..
..699333333996..
..699333333996..
...69333333996..
...69333333996..
...6993333996...
....66999996....
.....666666.....`]
);
Experiment! Don't copy my design verbatim.
Hit the Run button to load the legend. Nothing will show up yet but This will allow us to make our map in the next step.
3. Making the level
Levels are the easiest way to tell Sprig what to display on the screen. We'll only be having one level.
The following code can be used to make and set the level map.
setMap(map`.`);
Similar to sprites, click on the green map text to open up the map editor. Use the + and - signs on the edges to expand or to shrink the map. We want to create a 8x8 map.
Our map will only contain the player. We will write code later to spawn in the obstacles.
The code after expanding should be similar to this.
setMap(map`
........
........
........
........
........
........
........
...p....`);
Similar to the sprites, each character represents a sprite. The
.represents an empty tile.
4. Adding controls
A game is no fun if you cannot interact with it. We'll be adding controls to our game, so the player can move. Sprig allows for the use of wasd and ijkl keys. We'll be using a and d to move the player left and right.
onInput("a", () => {
  getFirst(player).x -= 1;
});
onInput()will run the code of the function when the key is pressed.getFirst()will get the first sprite of that type. We decrement its x position to move it left.
The code for moving right is similar.
onInput("d", () => {
  getFirst(player).x += 1;
});
We increment its x position to move it right.
In Sprig, the top left is (0, 0).
Run your game! We're now able to control the player with the a and d keys.
5. Spawning in obstacles
A game isn't fun if it takes no effort to play. We'll be adding obstacles to our game, so the player has to dodge them.
a) Making the obstacles spawn randomly
Let's make a function that will randomly spawn a new obstacle.
function spawnObstacle() {
  let x = Math.floor(Math.random() * 8);
  let y = 0;
  addSprite(x, y, obstacle);
}
Math.floor(Math.random() * 8)will generate a random integer between 0 and 7. y is always 0 as we want the obstacle to spawn at the top.
b) Making the obstacles fall
Nothing happens with the obstacle, because we haven't programmed that part yet. Let's do this!
We'll loop through all the obstacles and move them down by one.
function moveObstacles() {
  let obstacles = getAll(obstacle);

  for (let i = 0; i < obstacles.length; i++) {
    obstacles[i].y += 1;
  }
}
getAll()will get all the sprites of that type. We increase the y value of each obstacle to make it move down.
Let's test what we have so far.
Add the following to your code.
spawnObstacle();
Woo-hoo! We have our first obstacle!
Let's test the moving part. Append the following to your code.
moveObstacles();
moveObstacles();
Nice! The obstacle moved down twice as we called the function twice.
We can remove the testing code now.
c) Making the obstacles despawn
With the current code, the obstacles Never actually get removed.
We need to make it despawn when it reaches the bottom. We can detect this when y = 7.
function despawnObstacles() {
  let obstacles = getAll(obstacle);

  for (let i = 0; i < obstacles.length; i++) {
    if (obstacles[i].y == 7) {
      obstacles[i].remove();
    }
  }
}
.remove()will remove that sprite from the game.
We'll be calling this function when we make the game loop.
6. Detecting if the player gets hit
We'll again write a function so we can use it in the game loop.
function checkHit() {
  let obstacles = getAll(obstacle);
  let p = getFirst(player);

  for (let i = 0; i < obstacles.length; i++) {
    if (obstacles[i].x == p.x && obstacles[i].y == p.y) {
      return true;
    }
  }

  return false;
}
This function will loop through all obstacles and check if the player is on the same tile as the obstacle. If it is, it will return true.
7. Main game loop
We'll now be using all the functions we've created and putting them together in a main loop.
var gameLoop = setInterval(() => {
  despawnObstacles();
  moveObstacles();
  spawnObstacle();

  if (checkHit()) {
    clearInterval(gameLoop);
  }

}, 1000);
setInterval()allows us to repeat a function every x milliseconds. We set it to thegameLoopvariable so we can stop it later when the game ends.
We put the functions in this order, so the obstacles don't move the instant they spawn, and don't despawn the instant they move to the bottom. This ensures that the obstacles can appear at the top and the bottom.
Run the game and see what happens!
We can move around, the obstacles spawn and move down. When we lose, all the obstacles stop moving, but the player can still move.
We can fix this by creating a variable that stores if the game is running or not.
8. Game over
Let's create a variable right under setMap().
var gameRunning = true;
We'll also modify our game loop to change the variable when the player looses. We'll also add a message to tell the player that they lost.
  if (checkHit()) {
    clearInterval(gameLoop);
    gameRunning = false;
    addText("Game Over!", {
      x: 5,
      y: 6,
      color: color`3`
    });
  }
addText()will add text to the game. We set the color tocolor3` which is red.
We'll also modify our controls to only work when the game is running.
onInput("a", () => {
  if (gameRunning) {
    getFirst(player).x -= 1;
  }
});
onInput("d", () => {
  if (gameRunning) {
    getFirst(player).x += 1;
  }
});
What's next?
The game works! However, there currently isn't much.
It's up to you to add more features to the game. Here are some ideas.
- Add a score counter.
- Add a background.
- Add power ups that fall from the sky.
- Make the obstacles spawn faster over time.
Once you think you're done, submit your modified game to the Sprig Gallery! Teenagers who get their game added will also receive a Sprig console kit (while supplies last).
See this guide for more details.
Feel free to also share your work in the #scrapbook and #sprig channels on the Hack Club Slack. I would love to see your creations, mention me (@samliu)!
Thank you so much for reading my first workshop. It was a lot of fun to make, and I hope you enjoyed it as well.
Happy Hacking!
Final Code
const player = "p";
const obstacle = "o";

setLegend(
  [obstacle, bitmap`
.......66.......
........6.......
.....66.6.6.....
....66.66.66....
....666666.6....
...6699999966...
...69999999966..
..669999999996..
..669933339996..
..699333333996..
..699333333996..
...69333333996..
...69333333996..
...6993333996...
....66999996....
.....666666.....`],
  [player, bitmap`
................
................
................
.....00000......
....0.....0.....
....0.0.0.0.....
....0.....0.....
....0.000.0.....
....0.....0.....
.....00000......
.......0........
.....00000......
.......0........
.......0........
......0.0.......
.....0...0......`]
)

setMap(map`
........
........
........
........
........
........
........
...p....`)

var gameRunning = true;

onInput("a", () => {
  if (gameRunning) {
    getFirst(player).x -= 1;
  }
});

onInput("d", () => {
  if (gameRunning) {
    getFirst(player).x += 1;
  }
});

function spawnObstacle() {
  let x = Math.floor(Math.random() * 8);
  let y = 0;
  addSprite(x, y, obstacle);
}

function moveObstacles() {
  let obstacles = getAll(obstacle);

  for (let i = 0; i < obstacles.length; i++) {
    obstacles[i].y += 1;
  }
}

function despawnObstacles() {
  let obstacles = getAll(obstacle);

  for (let i = 0; i < obstacles.length; i++) {
   if (obstacles[i].y == 7) {
     obstacles[i].remove();
   }
  }
}

function checkHit() {
  let obstacles = getAll(obstacle);
  let p = getFirst(player);

  for (let i = 0; i < obstacles.length; i++) {
    if (obstacles[i].x == p.x && obstacles[i].y == p.y) {
      return true;
    }
  }

  return false;
}
var gameLoop = setInterval(() => {
  despawnObstacles();
  moveObstacles();
  spawnObstacle();

  if (checkHit()) {
    clearInterval(gameLoop);
    gameRunning = false;
    addText("Game Over!", {
      x: 5,
      y: 6,
      color: color`3`
    });
  }

}, 1000);

